Step2: How to Add Printer to Computer (Mac)
There are TWO ways to add a printer in MacOS.
Please choose one of the methods below.
💡Important Tip: Connect the USB Printer Properly
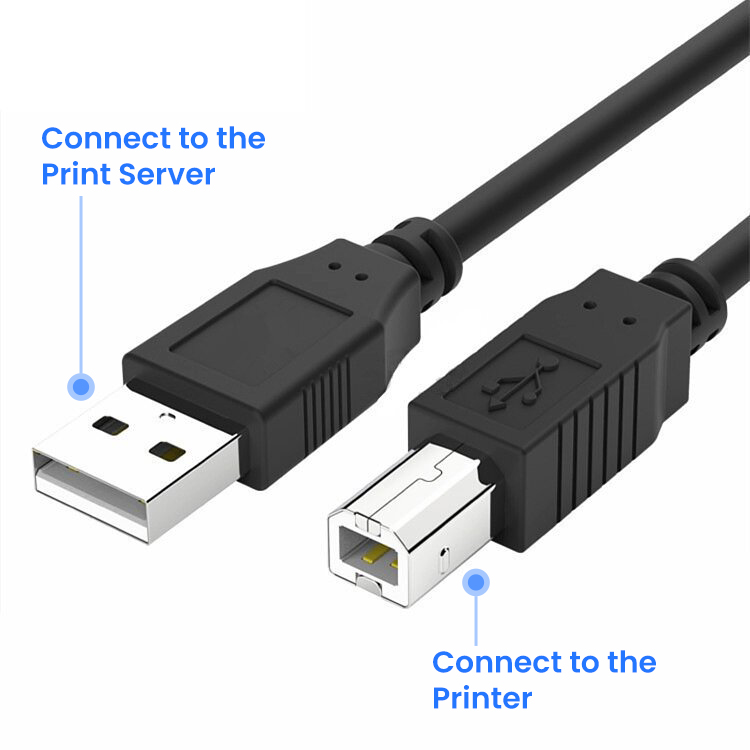
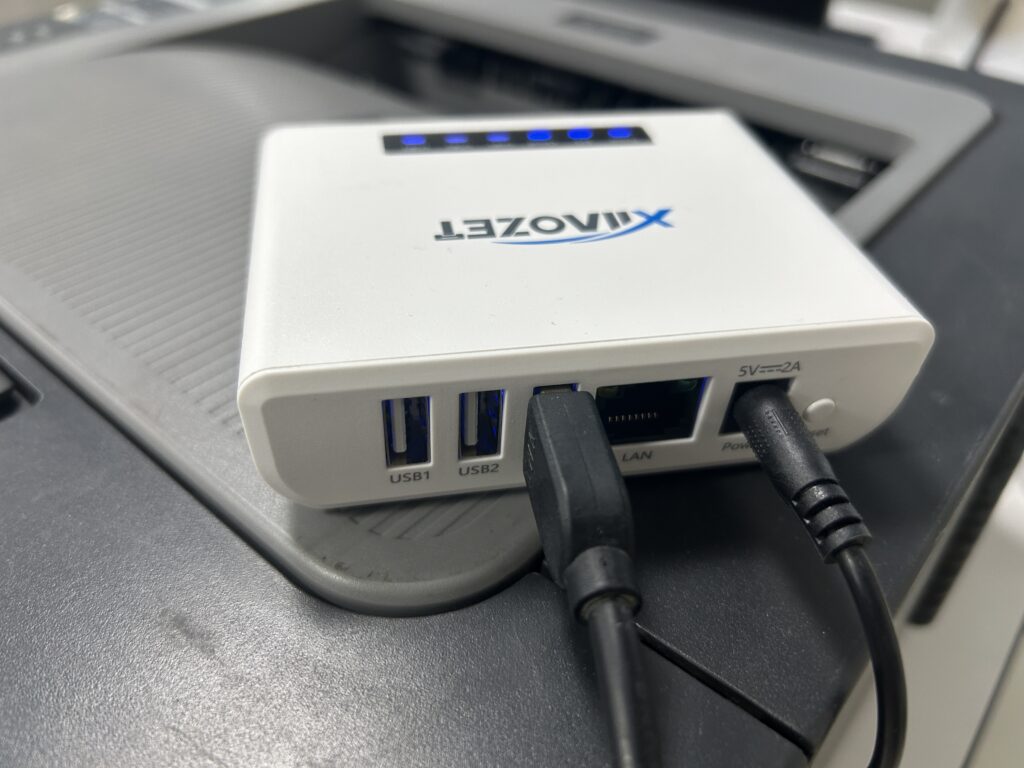
Please connect the USB cable of your printer to the USB port of the print server.
Make sure the square end (Type-B or CN36) is plugged into the printer, and the flat end (Type-A) is plugged into the print server.
This step is crucial to ensure proper data transmission.

Method 1: Manually Add a Printer via IP Address (Mac)
⚠️ Important: Please download and install the appropriate printer driver from the printer manufacturer’s official website before proceeding.
Step One: Open the web management page of the Print Server
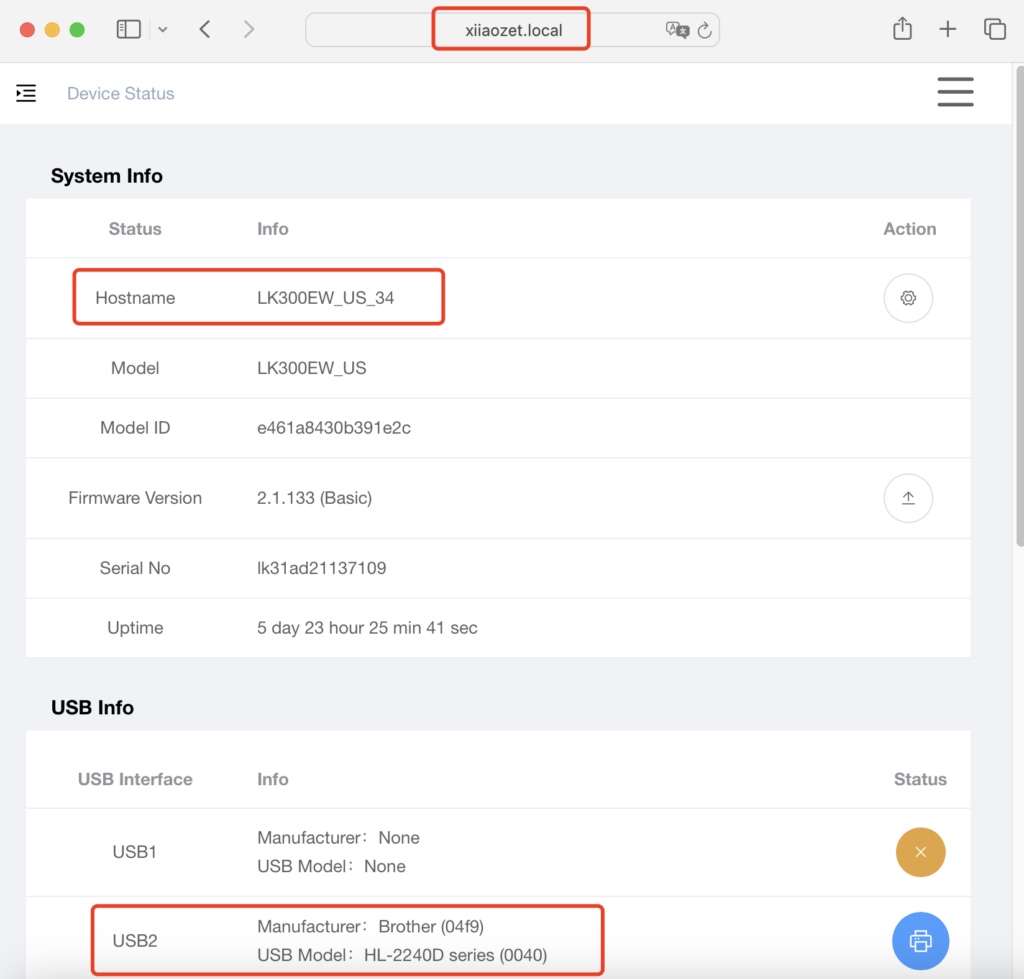
After configuring the network for print server, open your browser and enter the following address: xiiaozet.local or assigned IP address, enter to access the print server’s Web Management Page.
On the Web Management Page, you can find important details such as the Hostname, IP Address, and the USB Port where the printer is connected.
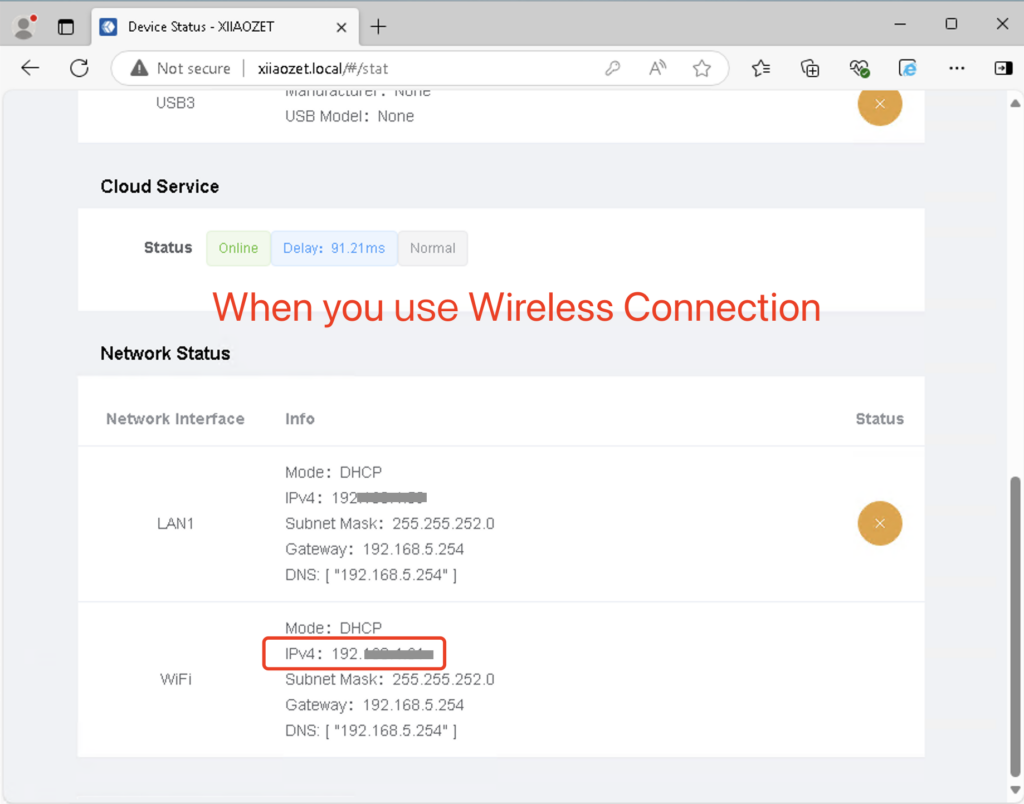
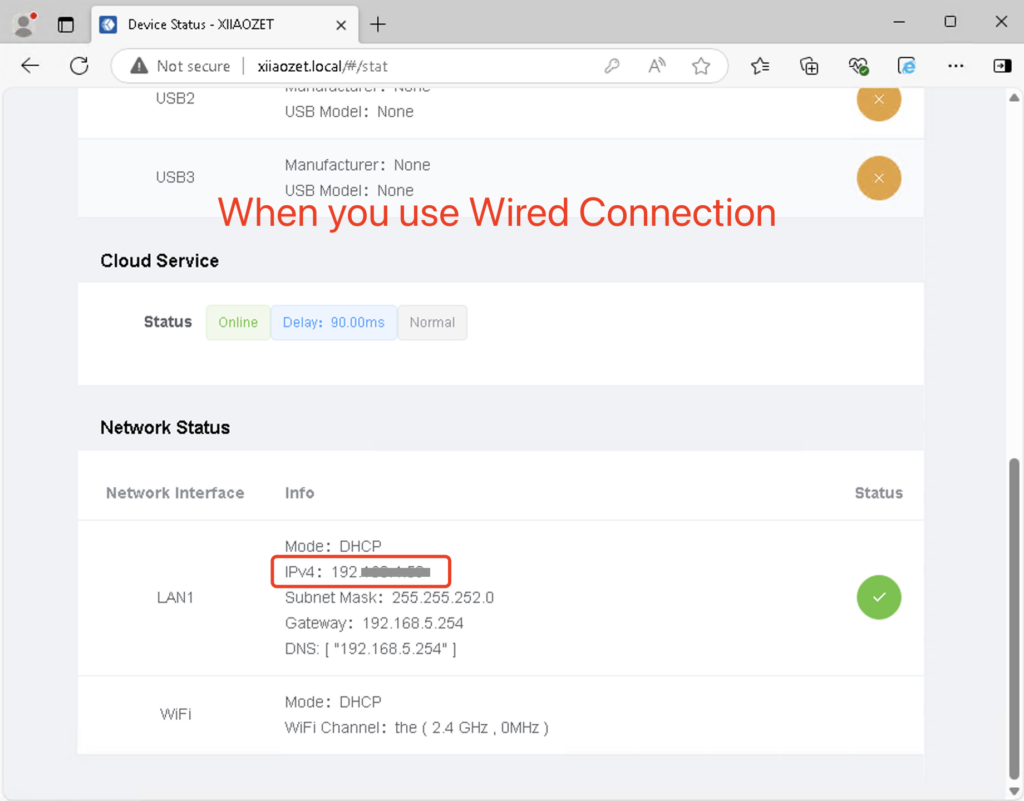
Using the correct IP address is essential for a successful setup.
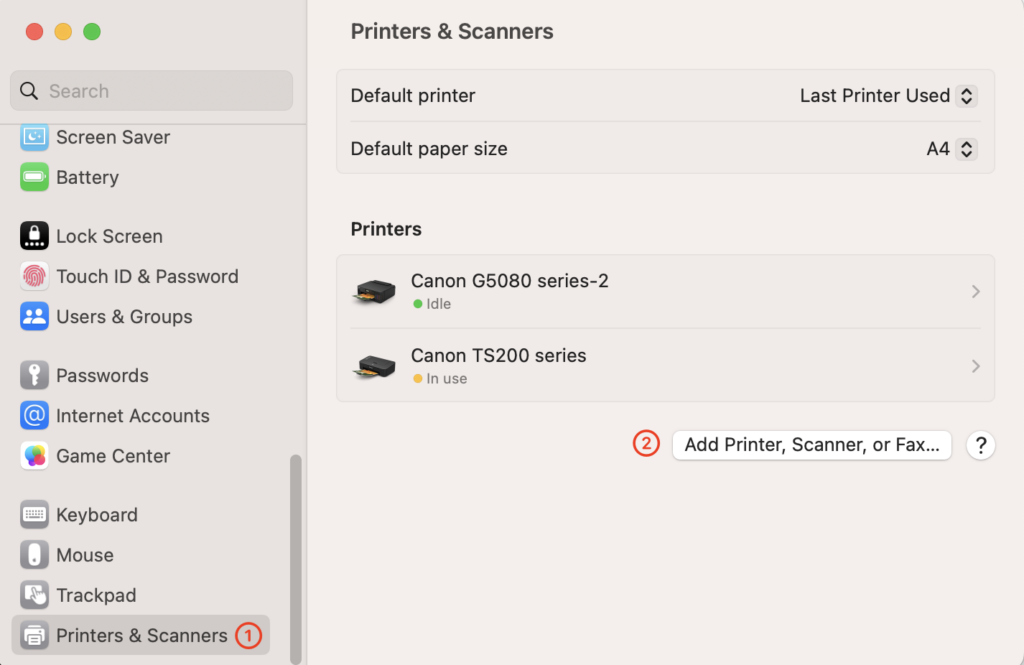
Step Two: Open “Printers & Scanners” Settings
- Click the Apple icon in the top left corner and select “System Preferences.”
- Open the “Printers & Scanners” section.
- Click “Add a Printer, Scanner, or Fax” in the bottom left corner.
Step Three: Configure the IP Printer
- In the Address field, enter the IP address of the print server (e.g.,
192.168.x.xx).- You can find the IP address on the Web Management Page (see Step 2).
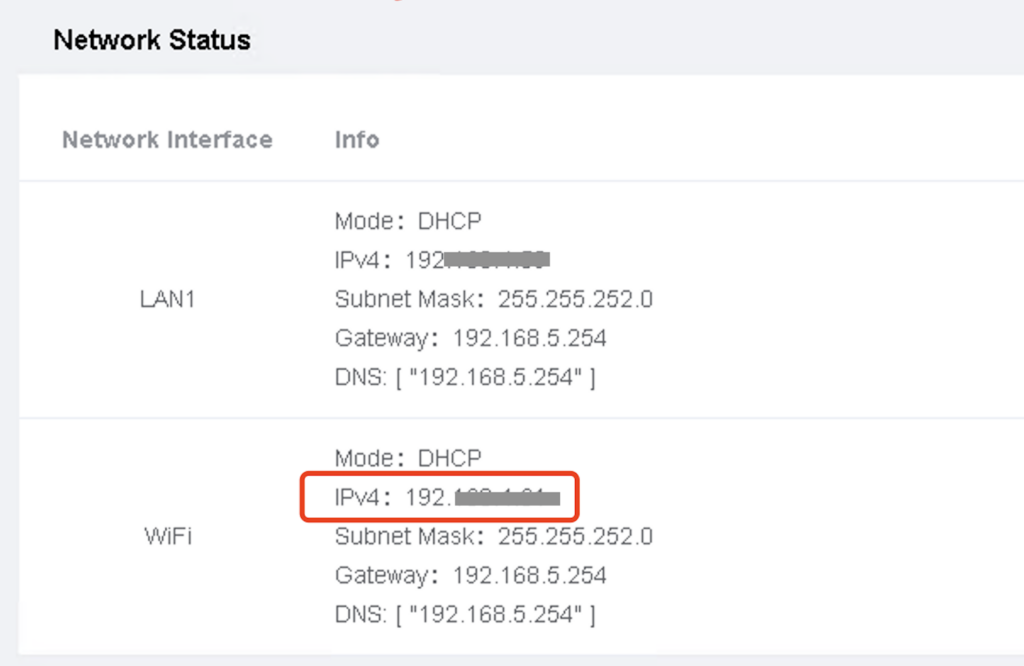

Note: For the LK300W and LK300EW models, use the correct port number!
For models such as the LK300W or LK300EW: Ensure the port assignment is correct according to the web management page.
- USB1: 9100 (e.g., 192.168.4.61:9100)
- USB2: 9101 (e.g., 192.168.4.61:9101)
- USB3: 9102 (e.g., 192.168.4.61:9102)

- In the “Protocol” drop-down menu, select “HP Jetdirect – Socket.” ( important! )
- Note: To avoid sending print jobs to the wrong printer, it is recommended to rename your printer to include ‘print server’.

Step Four: Select the Printer Driver
- In the “Use” field, click “Select Software…” which will open a new window to choose the printer driver.
- In the driver list, find and select the driver that matches your printer model.
- Note: If the printer model cannot be found, it means that the printer driver has not been installed on the computer. You need to go back to Step One.
- Click the “OK” button to confirm your selection.
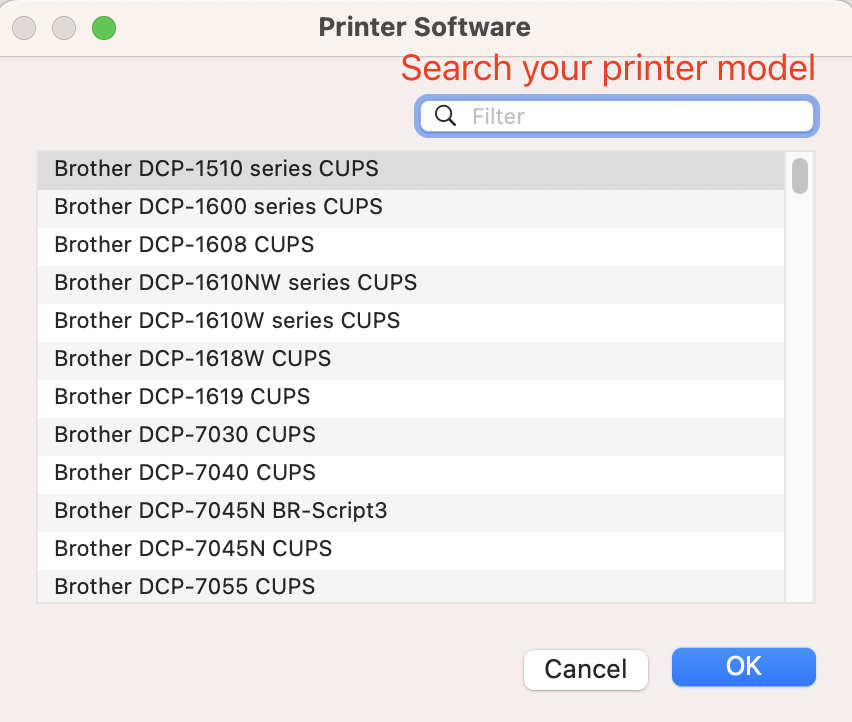
Take brother printer as an example:
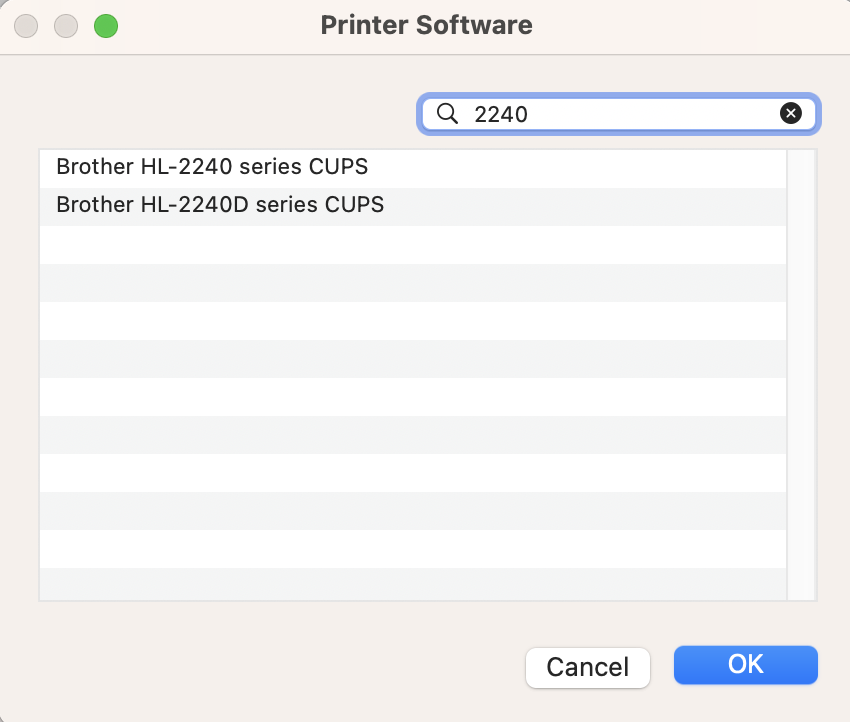

Important: Make sure all three of the following are correct:
✔ The correct IP address
✔ The correct port number
✔ The appropriate printer driver
The printer will only work properly if all three are set up correctly.
- After confirming that all settings are correct, click the “Add” button.
- Once added successfully, the newly added printer will appear in the “Printers & Scanners” list.

Step Five: Send a print job to the printer
Important !!! When sending a print job, make sure to select the newly added printer by its name.

Method 2: Manually Add a Printer via Hostname (Mac)
⚠️ Important: Please download and install the appropriate printer driver from the printer manufacturer’s official website before proceeding.
Step One: Open the web management page of the Print Server
After configuring the network for print server, open your browser and enter the following address: xiiaozet.local or assigned IP address, enter to access the print server’s Web Management Page.
On the Web Management Page, you can find important details such as the Hostname, IP Address, and the USB Port where the printer is connected.
Step Two: Open “Printers & Scanners” Settings
- Click the Apple icon in the top left corner and select “System Preferences.”
- Open the “Printers & Scanners” section.
- Click “Add a Printer, Scanner, or Fax” in the bottom left corner.

Step Three: Configure the IP Printer
- From the pop-up menu, select “Add IP Printer.”
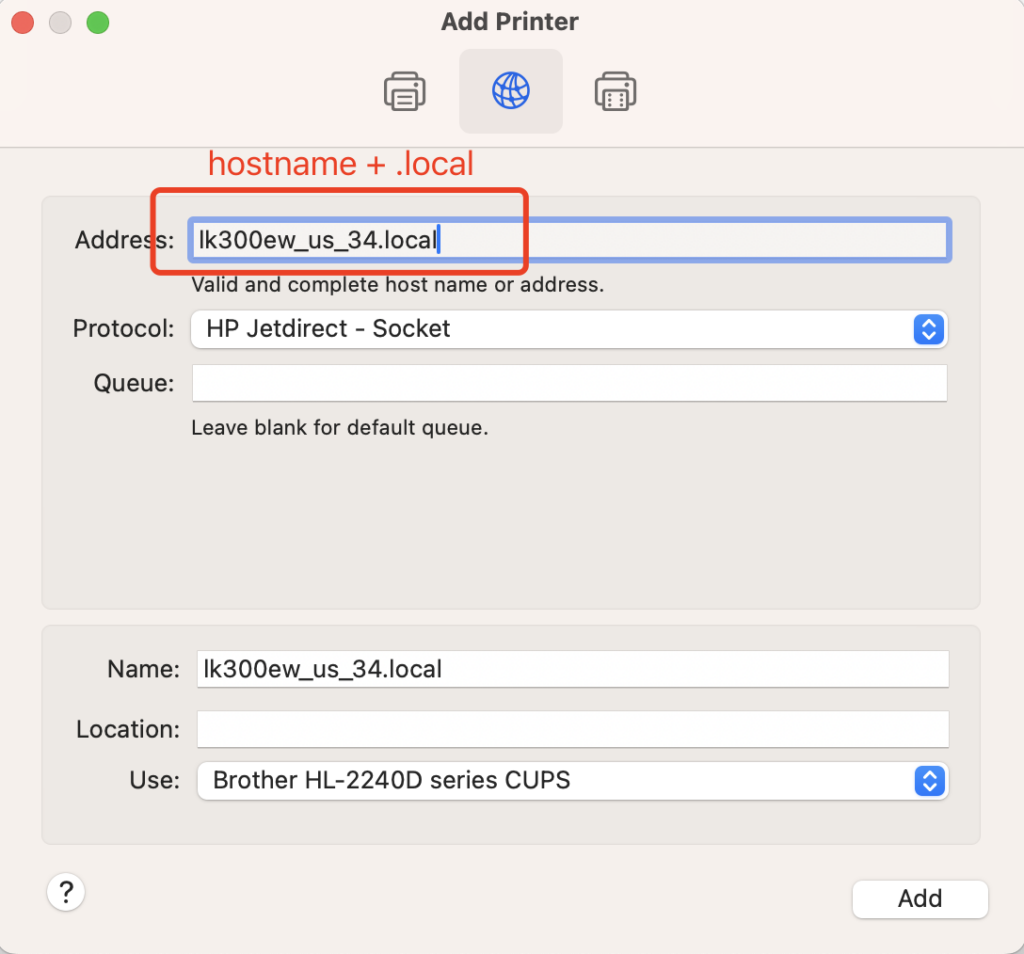
- In the “Address” field, enter the hostname of your print server, followed by “.local” and the appropriate port number.
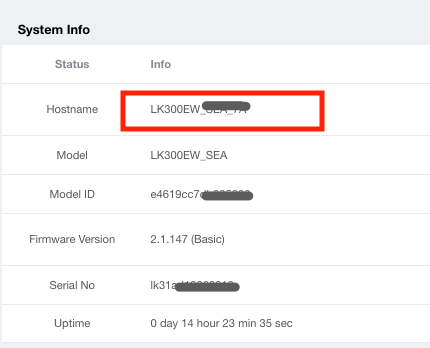
Example:lk100w_us_71.local- Find the hostname of your print server by visiting its web management page. (Refer to Step 1)
Note: For the LK300W and LK300EW models, use the correct port number!
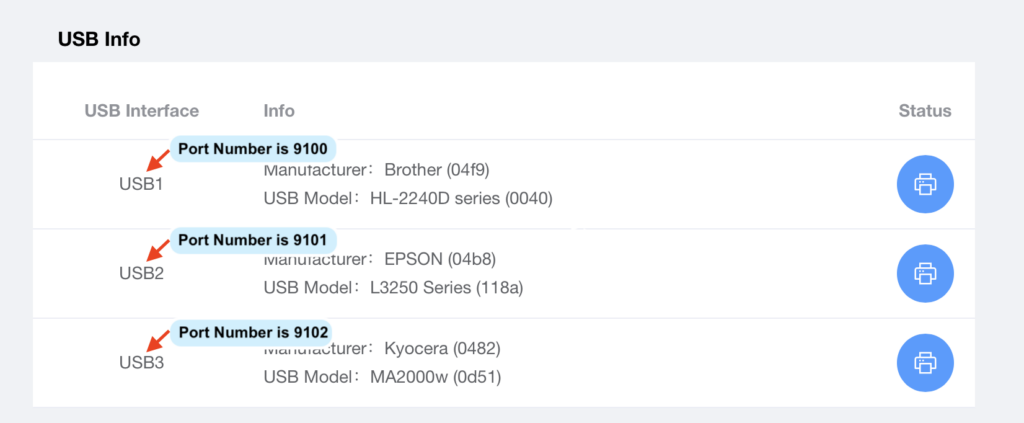
For models such as the LK300W or LK300EW: Ensure the port assignment is correct according to the web management page.
- USB1: 9100 (e.g., 192.168.4.61:9100)
- USB2: 9101 (e.g., 192.168.4.61:9101)
- USB3: 9102 (e.g., 192.168.4.61:9102)

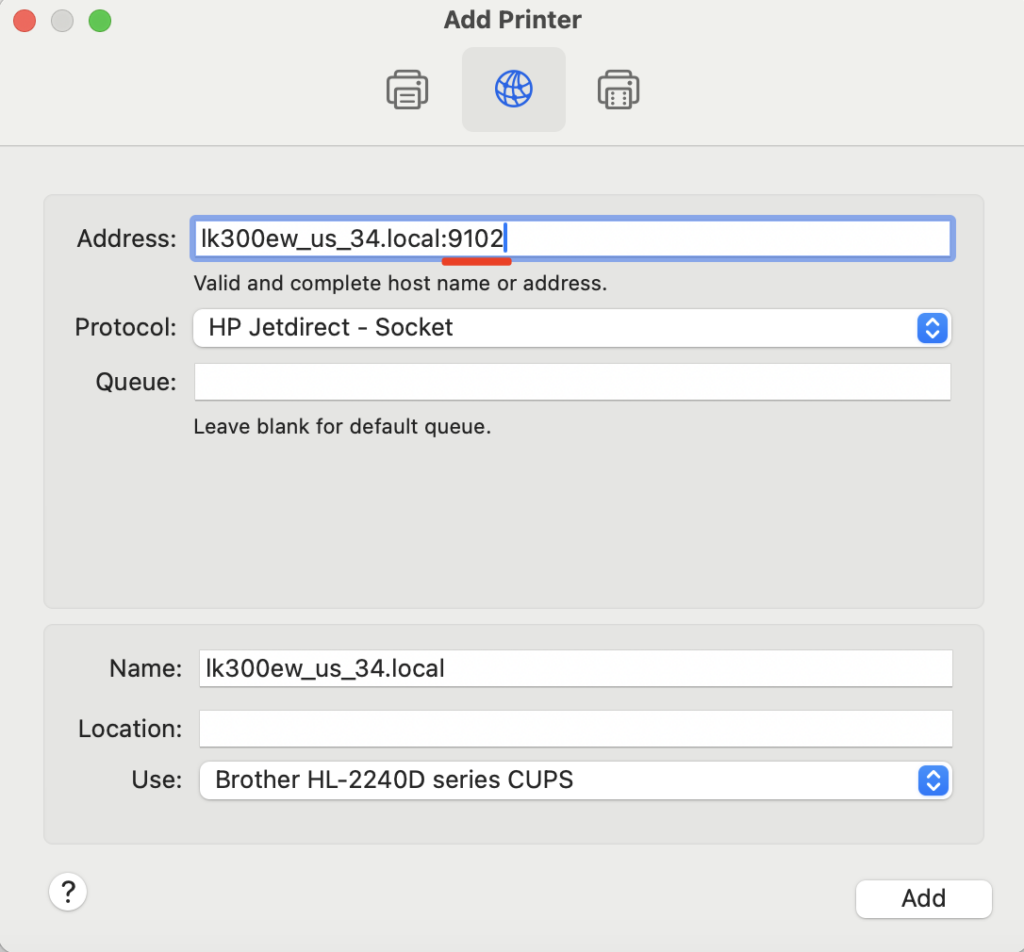
- From the “Protocol” drop-down menu, select “HP Jetdirect – Socket.”
- Tip: To avoid accidentally sending print jobs to the wrong printer, it’s recommended to rename the printer and include the term “print server” in its name.
For example: “Office Printer (print server)”
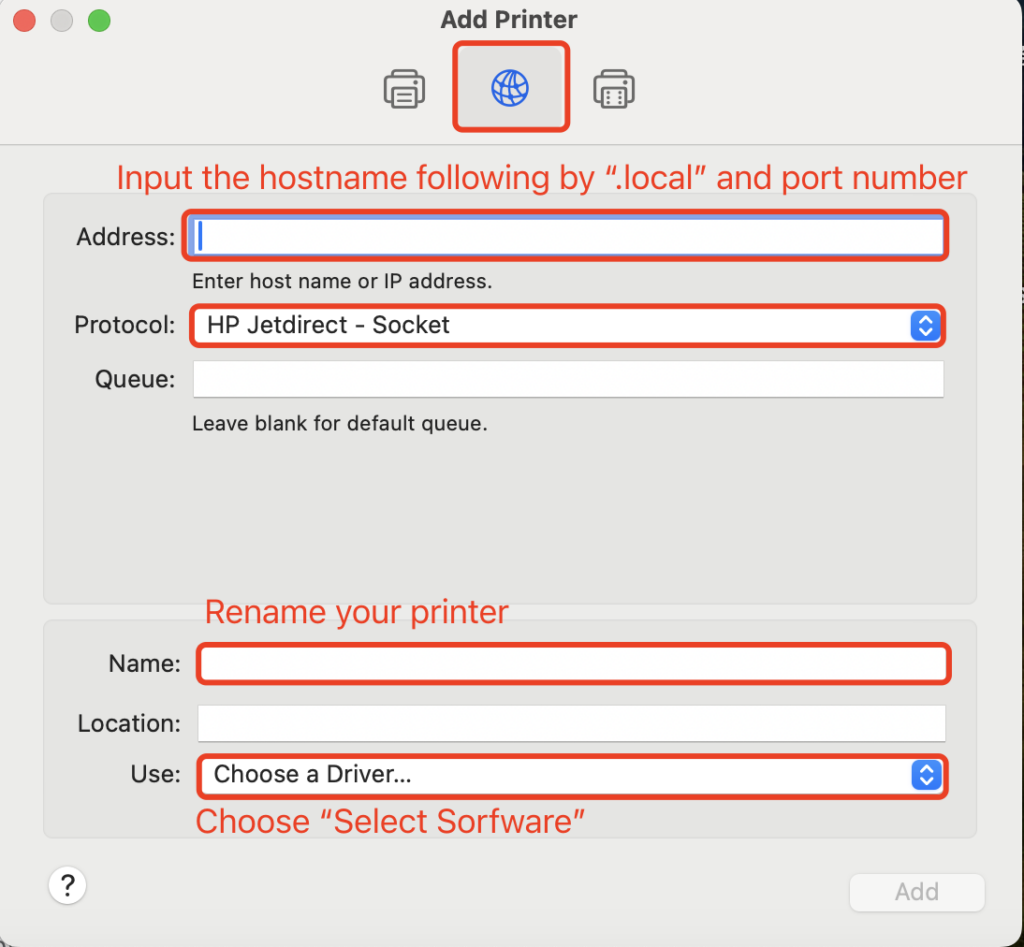
Step Four: Select the Printer Driver
- In the “Use” field, click “Select Software…” which will open a new window to choose the printer driver.
- In the driver list, find and select the driver that matches your printer model.
- Note: If the printer model cannot be found, it means that the printer driver has not been installed on the computer.
- Click the “OK” button to confirm your selection.

Take brother printer as an example:

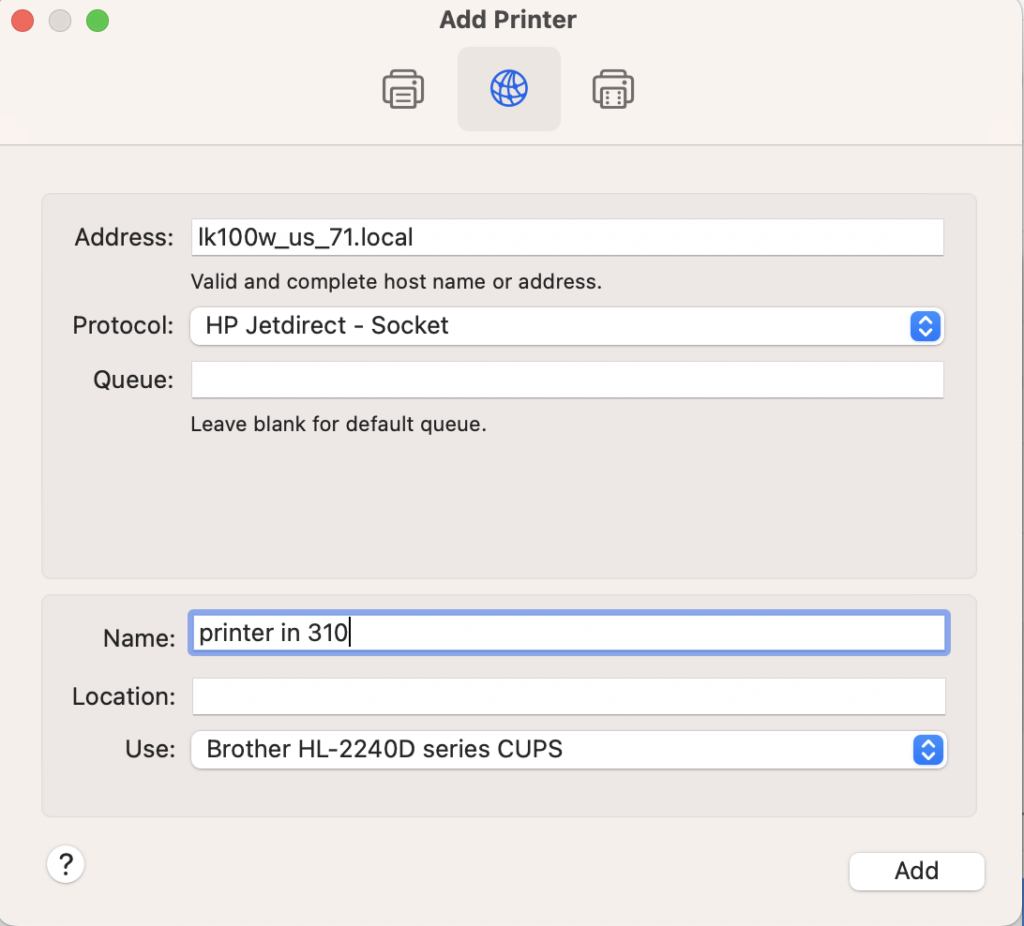
Important: Make sure all three of the following are correct:
✔ The correct Hostname of your print server with the extension “.local”
✔ The correct port number
✔ The appropriate printer driver
The printer will only work properly if all three are set up correctly.
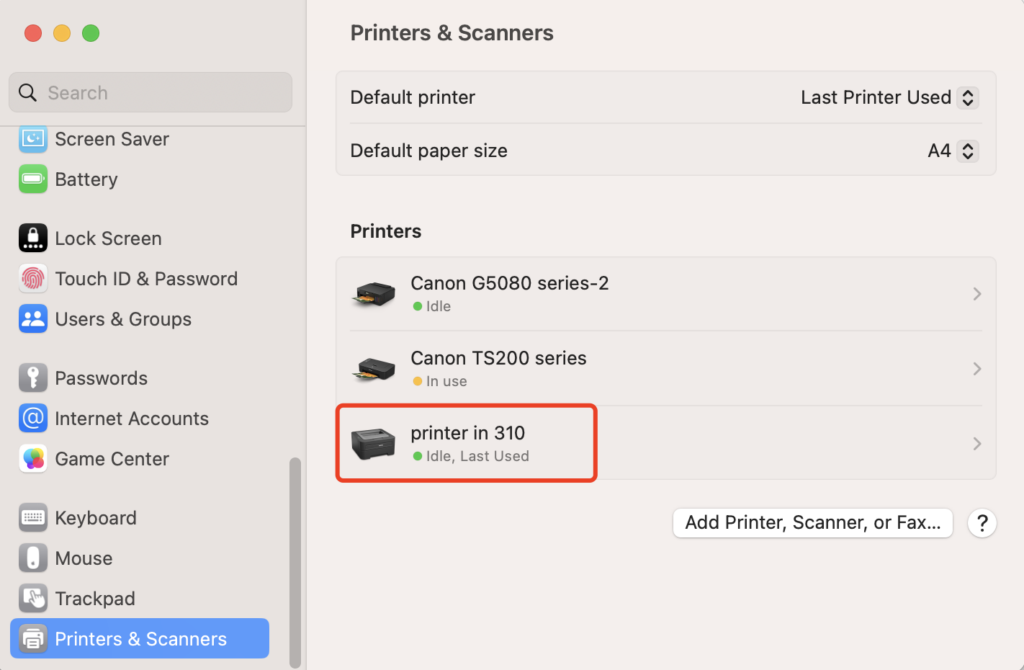
- After confirming that all settings are correct, click the “Add” button.
- Once added successfully, the newly added printer will appear in the “Printers & Scanners” list.
Step Five: Send a print job to the printer
Important !!! When sending a print job, make sure to select the newly added printer by its name.
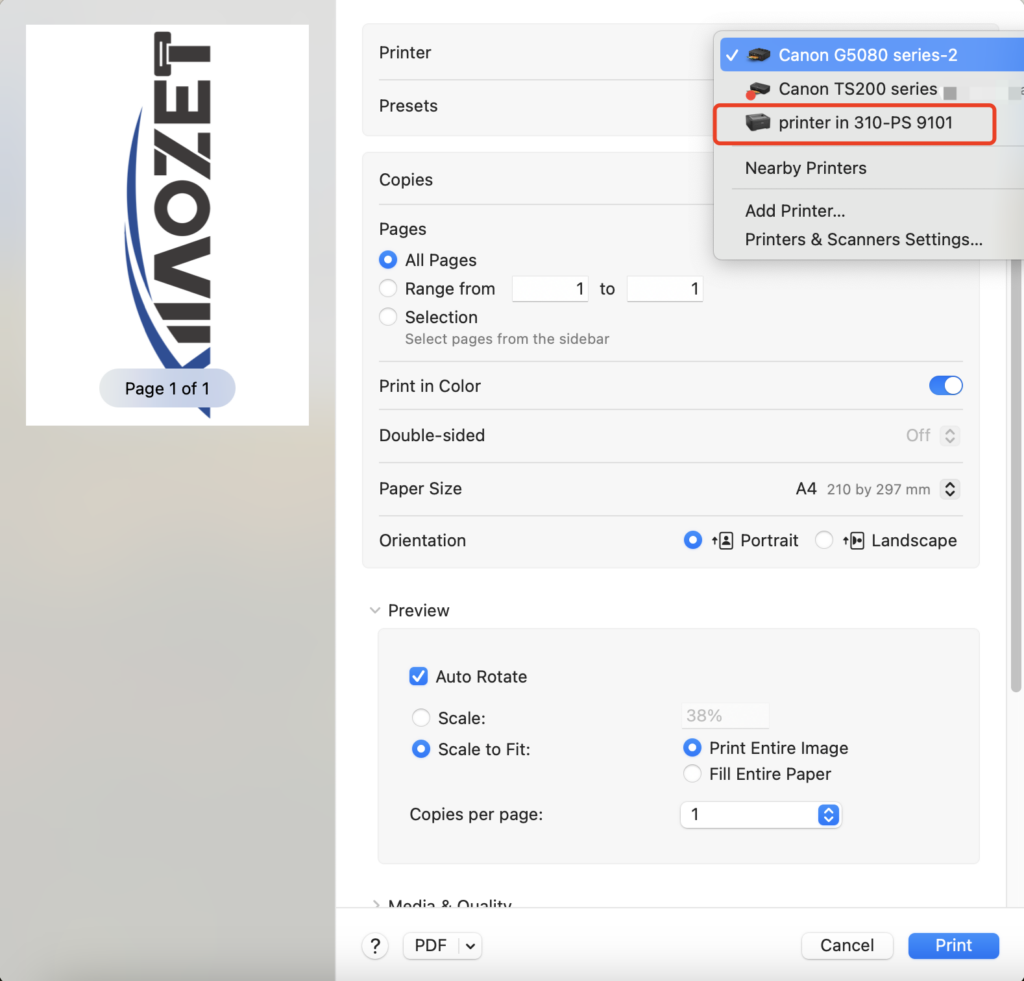
⚠️ After the configuration is completed, please avoid modifying any settings on the web management page, such as the hostname or login password. Doing so may cause the previously configured printer settings to become invalid.
Common Installation Issues
- Ensure that both the print server and the Mac are on the same network.
- If you cannot find the appropriate driver when selecting the software, visit the printer manufacturer’s website to download the latest driver.
- Note: LK100EW/ LK300EW Model: If the above steps do not resolve your issue, please use the Virtual USB Connection Tool to connect to the printer. Click the tutorial.
User Installation Statistics
| Printer Model | Compatibility | Notes/Instructions |
| EPSON Lxxx Ink Tank Series | Compatible | On Mac, disable bidirectional mode after installation to enable printing. |
| Brother MFC-8530DN | Compatible | On Mac, choose “Generic PostScript Printer” as the driver. |
| Samsung CLP-360 | Compatible | Connect the printer to Mac first, install the driver, then connect it to our server. |
| HP Officejet 4500 | Compatible | On Mac, use HP Officejet 4500 driver during installation. |
| HP Deskjet 1510 series | Compatible | On Mac, use HP Deskjet 1510 series driver during installation. |
| HP LaserJet Pro MFP M126a | Compatible | On Mac, use HP LaserJet Pro MFP M126a driver during installation. |
| HP LaserJet Pro MFP M125a | Compatible | On Mac, use HP LaserJet Pro MFP M125a driver during installation. |
| Fuji Xerox DocuPrint M158b | Compatible | On Mac, use FX DocuPrint M158 driver during installation. |
| HP LaserJet M1005 | Compatible | On Mac, use HP LaserJet M1005 driver during installation. |
| Lenovo M7150F | Compatible | Compatible with Mac. |
| Fuji Xerox DocuPrint CM215 | Compatible | Compatible with Mac, use FX DocuPrint CM215 b v1.071 driver during installation. |
| HP LaserJet Pro M1136 | Compatible | Print jobs cannot be automatically deleted from the queue (to enable bidirectional support in server settings). |
| Brother MFC-7470D | Compatible | On Mac, use Brother MFC-7470D CUPS driver during installation. |
| Brother MFC-7340 | Compatible | On Mac, use Brother MFC-7340 driver during installation. |
| Samsung SCX-4321 | Compatible | On Mac, use Samsung SCX-4321 driver during installation. |
| Brother DCP-7080 | Compatible | On Mac, use Brother DCP-7080 CUPS driver during installation. |
| Brother MFC-7360 | Compatible | Compatible with Mac. |
| HP LaserJet 1020 | Compatible | On Mac, use HP LaserJet 1022 driver during installation. |
| Canon iC MF4320d (4350) | Compatible | Compatible with Mac. |
| Epson Dot Matrix Printers | Compatible | Compatible with Mac (Epson 24-Pin Series, Epson 9-Pin Series). |
| Oki Dot Matrix Printers | Compatible | Compatible with Mac (Oki 24-Pin Series, Oki 9-Pin Series). |
- If the issue persists, please send a screenshot of the error message along with a brief description to: support@xiiaozet.net
- Alternatively, you can contact us directly using the Chat Box on the right.
- Our technical support team typically responds within 12 hours.


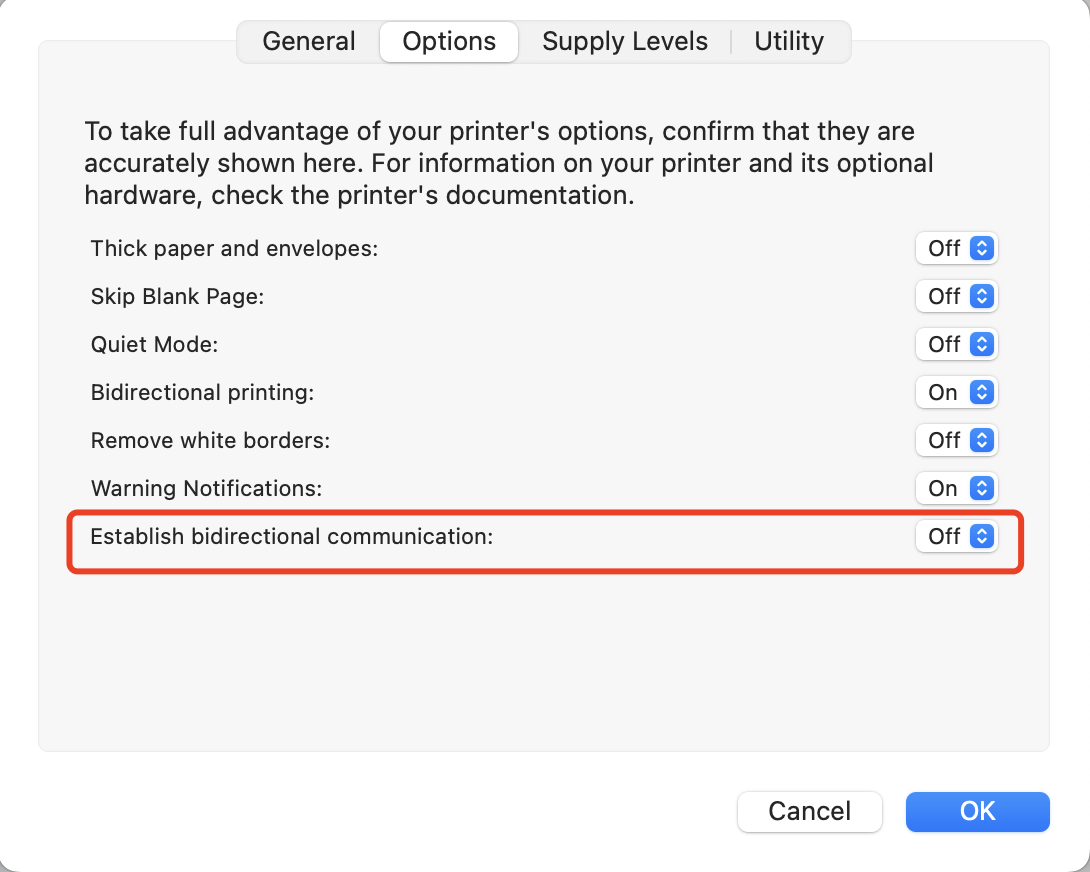
Hello. I am on a MacBook Air. I have tried the Ip address and the host name. The one thing that I am having trouble with is finding the print driver on the software list. I am trying to connect a cannon pixma TS202 printer.
If you can’t find your printer driver under the Use dropdown, please download and install the corresponding driver for your Canon Pixma TS202 directly from Canon’s official website.
If your printer works properly when connected to your MacBook Air via a USB cable, it should also work normally after being added through our device.