Step2: How to Add Printer to Computer (Windows)
Choose your installation path based on convenience and stability. Pick the one that best fits your needs.
|
Method | |||
|
Best for |
Beginners who want a 1-click setup. |
Static IP environments or professional IT setups. |
Perfect if your router frequently changes device IPs. |
|
Requirement |
Need to download a small tool. Can be uninstalled after setup. |
No software installation needed. |
No software installation needed. |
|
Key Advantage |
Fast, Software does the heavy lifting—finds the printer and driver for you. |
Simple connection if your IP address is fixed and never changes. |
Anti-IP Change. Stays connected even if your router reboots or reassigns IPs. |
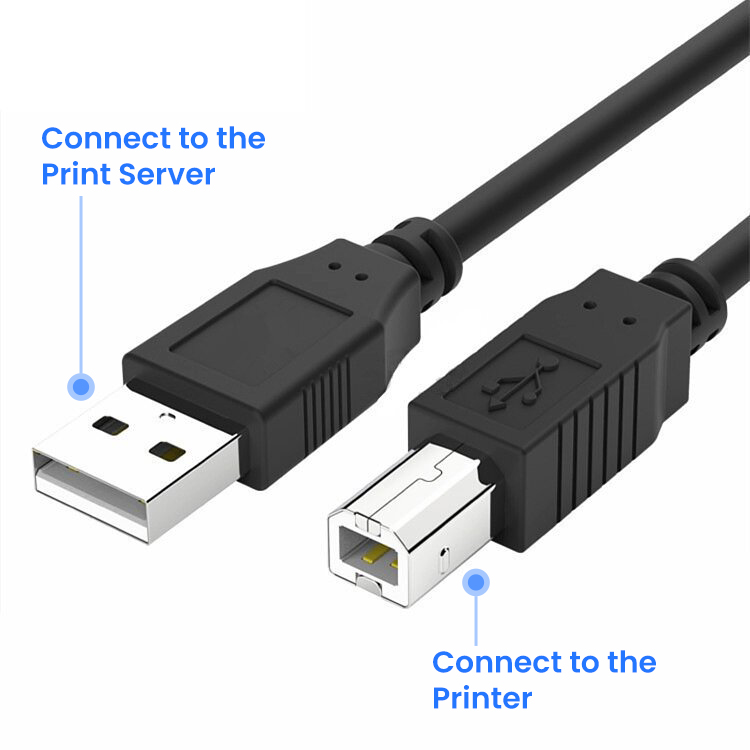
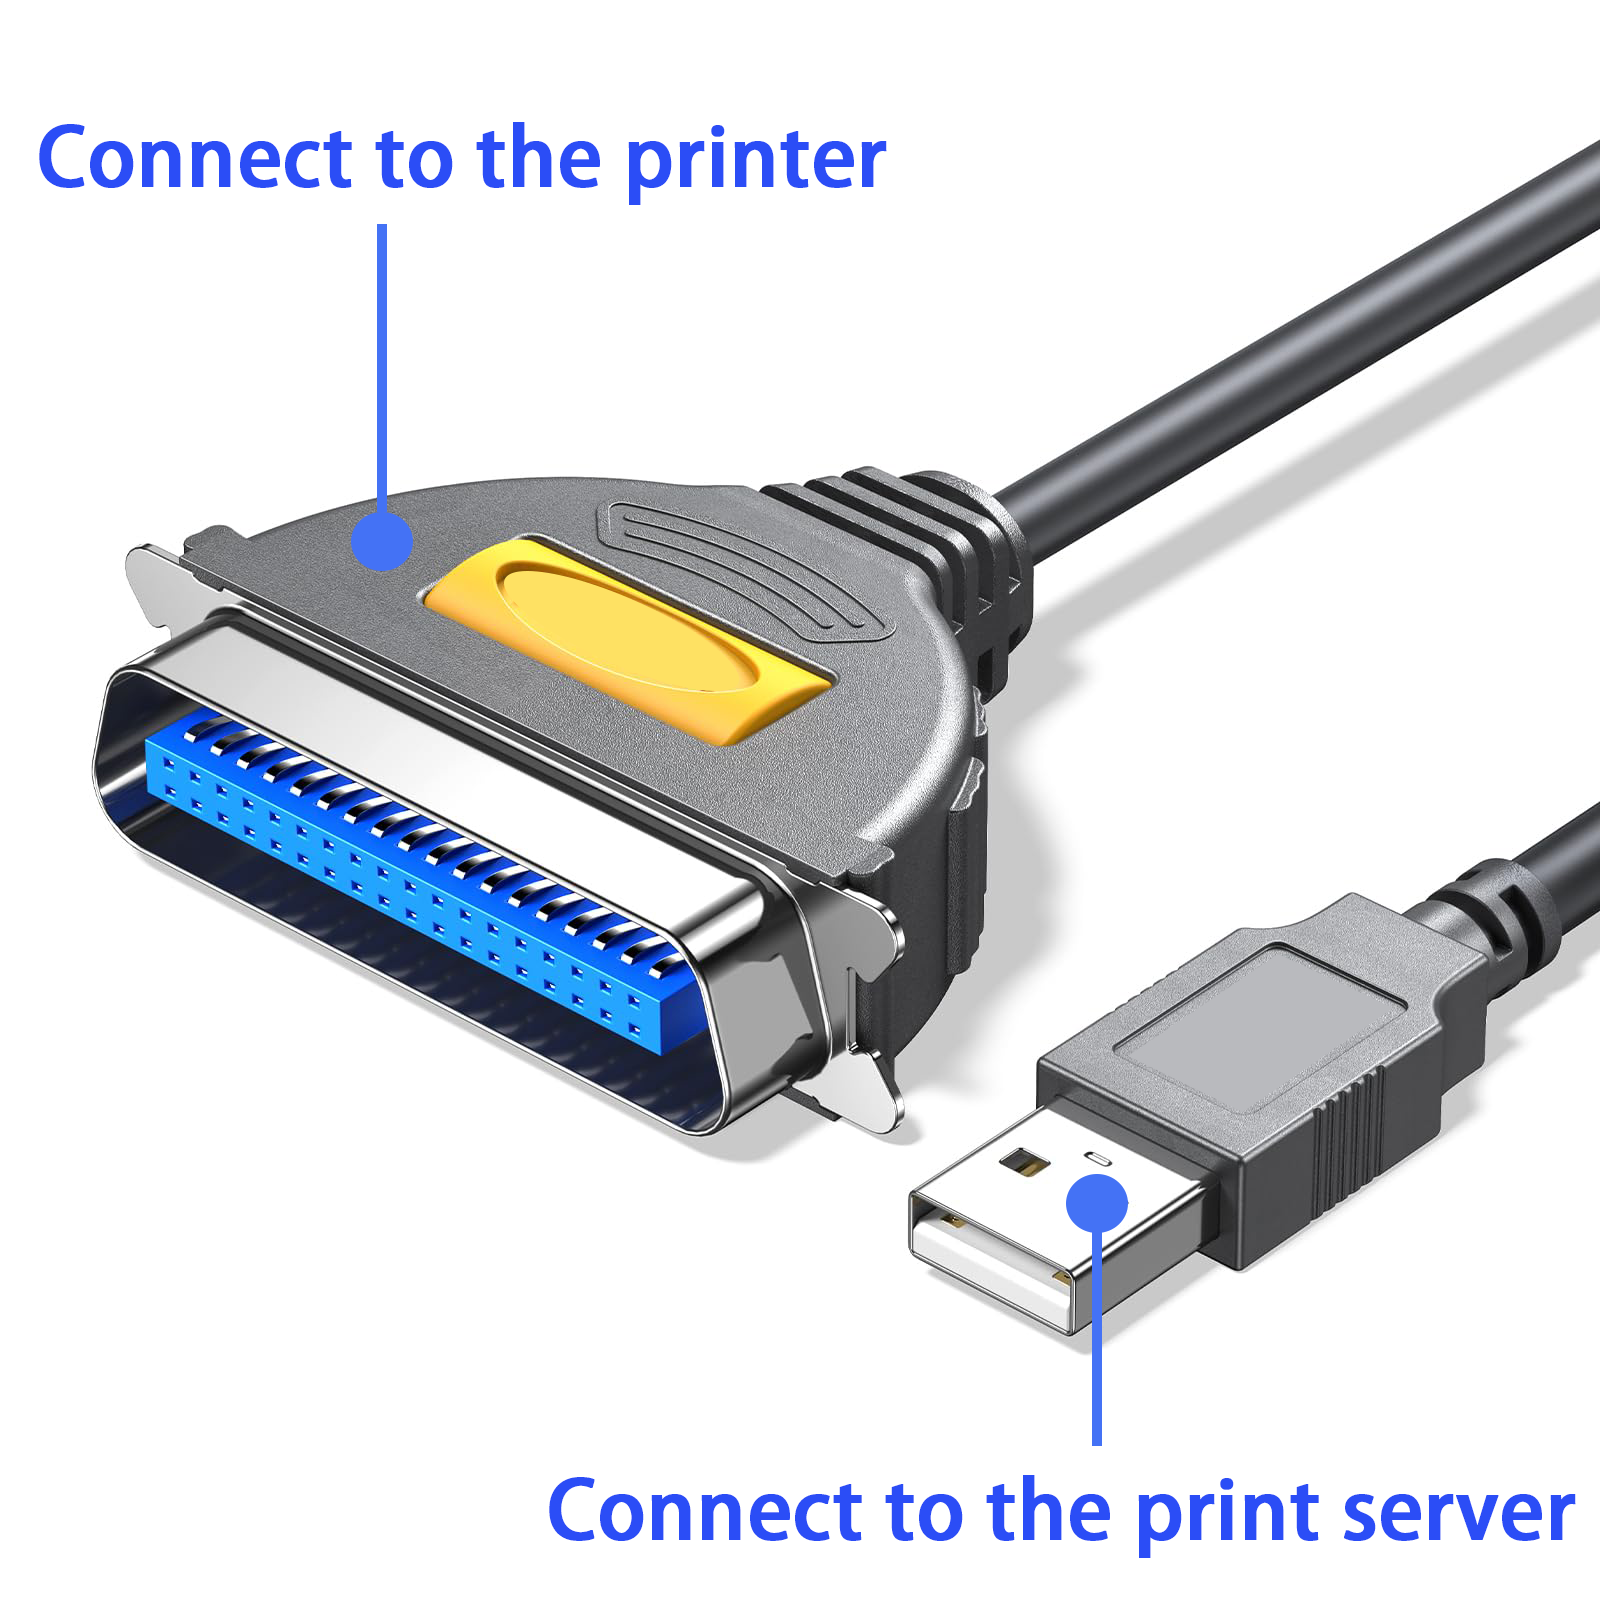
💡Important Tip: Connect the USB Printer Properly
Please connect the USB cable of your printer to the USB port of the print server.
Make sure the square end (Type-B or CN36) is plugged into the printer, and the flat end (Type-A) is plugged into the print server.
This step is crucial to ensure proper data transmission.
Method 1: Add a Printer Using the Quick Installer Tool (Windows)
- Visit www.xiiaozet.net/download and download the Printer Setup Guide Tool.
Note: If you are unable to download or use the tool, please proceed with Method 2 or Method 3 to add the printer manually.
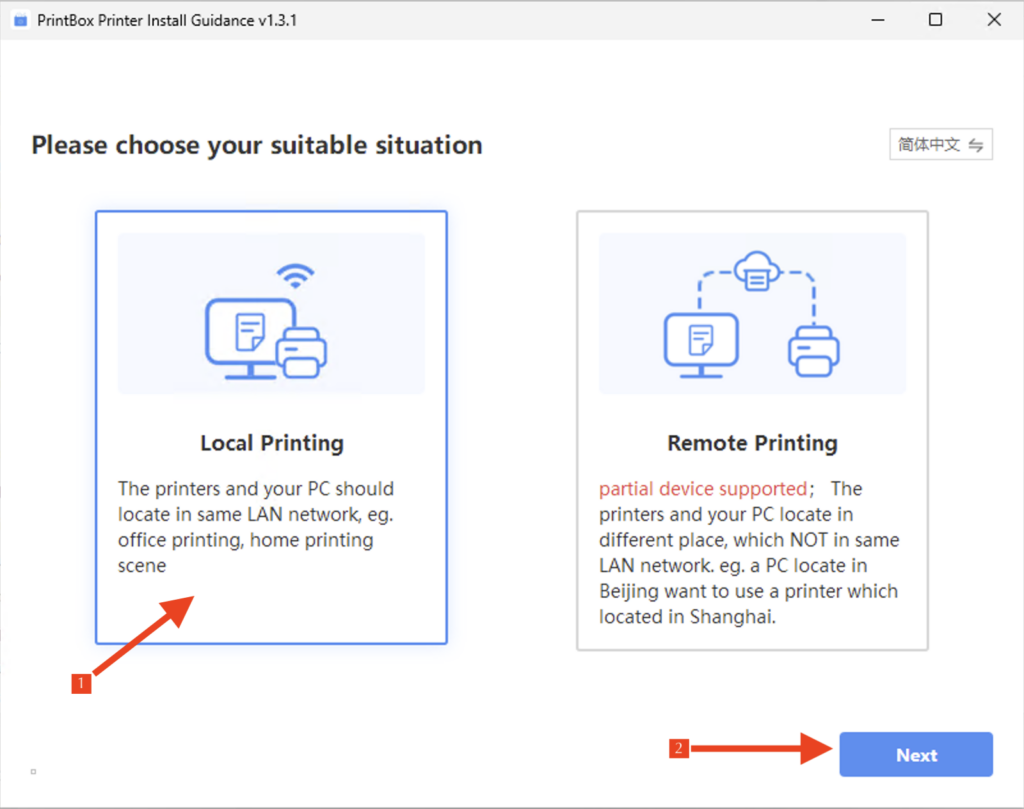
- Open the installation tool and choose “Local Printing” then proceed by clicking “Next.”
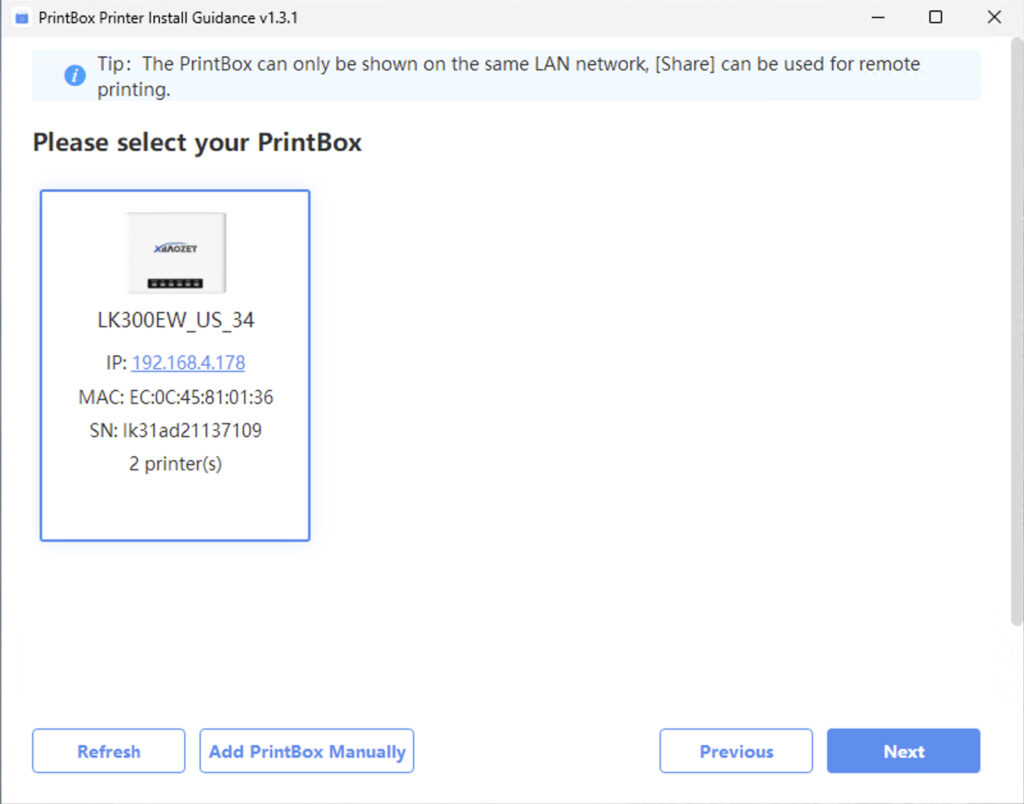
3. The installation tool will search for Xiiaozet print servers in the local network. Choose the print server from the search results and click “Next”.
4. The installation tool will automatically identify the printer model of the server, detect and match the corresponding driver, and select the printers for installation. Click “Install Now” for immediate installation.
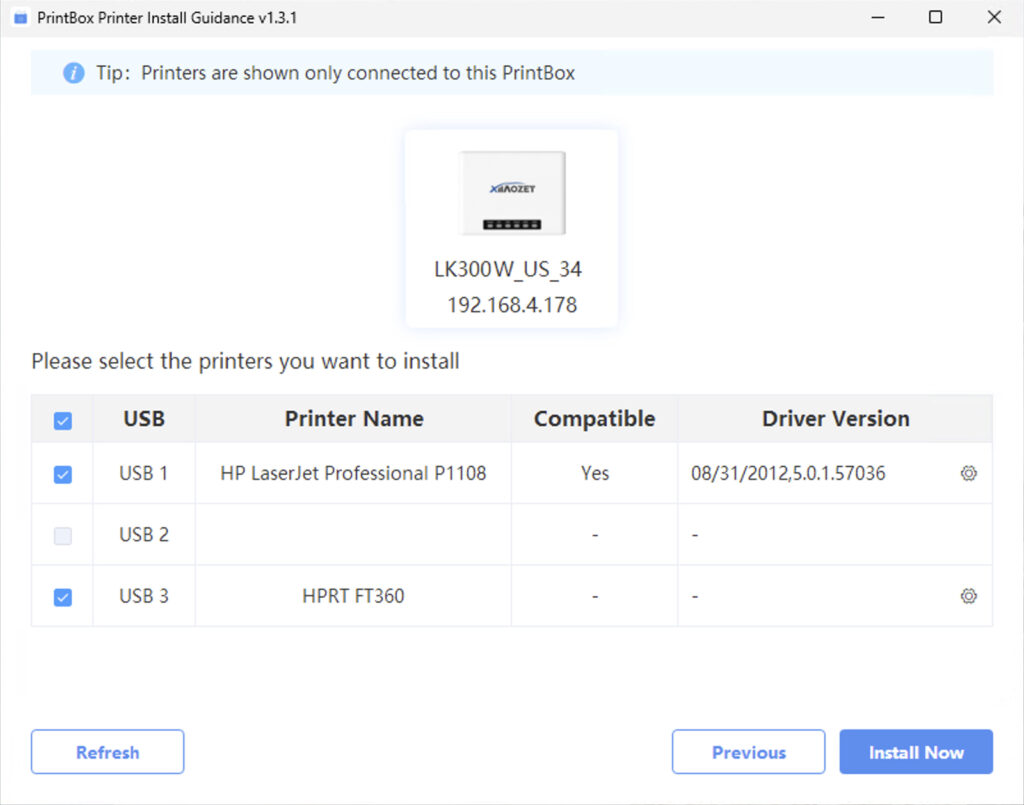
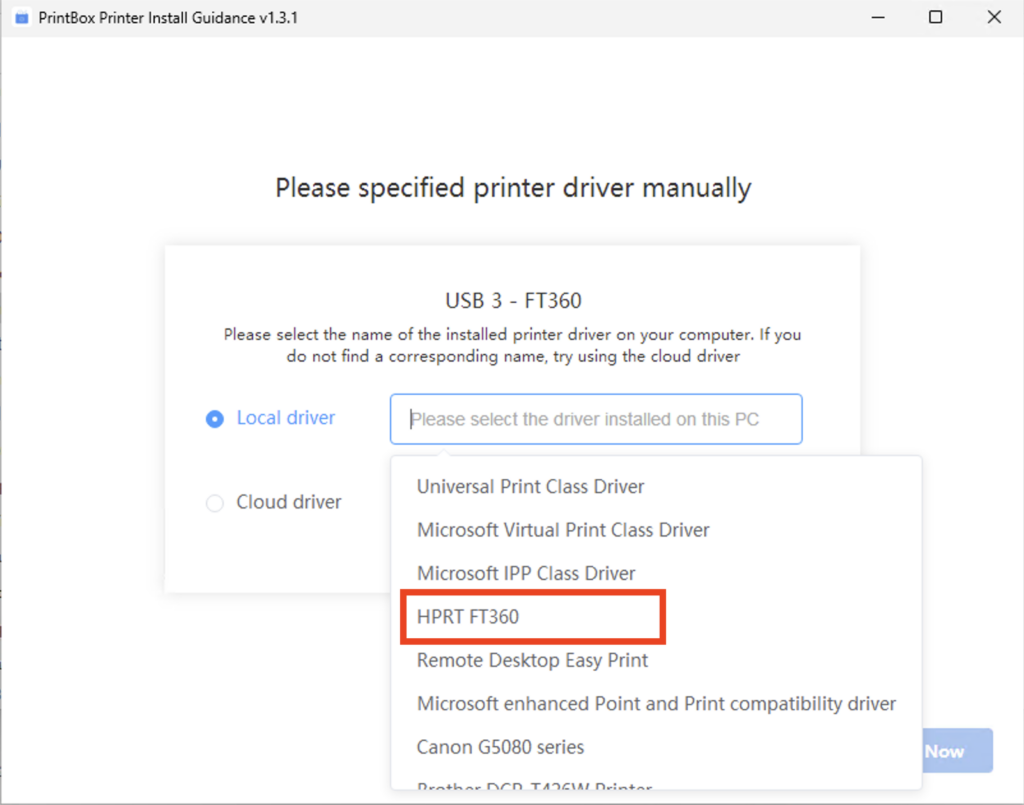
Note: If the installation tool fails to match the appropriate printer driver, it does not necessarily mean that the printer is incompatible; it may be because our database has not yet included the driver for this model. You will need to select a local driver. If there is no driver available locally that matches your printer model, you should visit the official website of the printer brand, download, and install the appropriate driver.
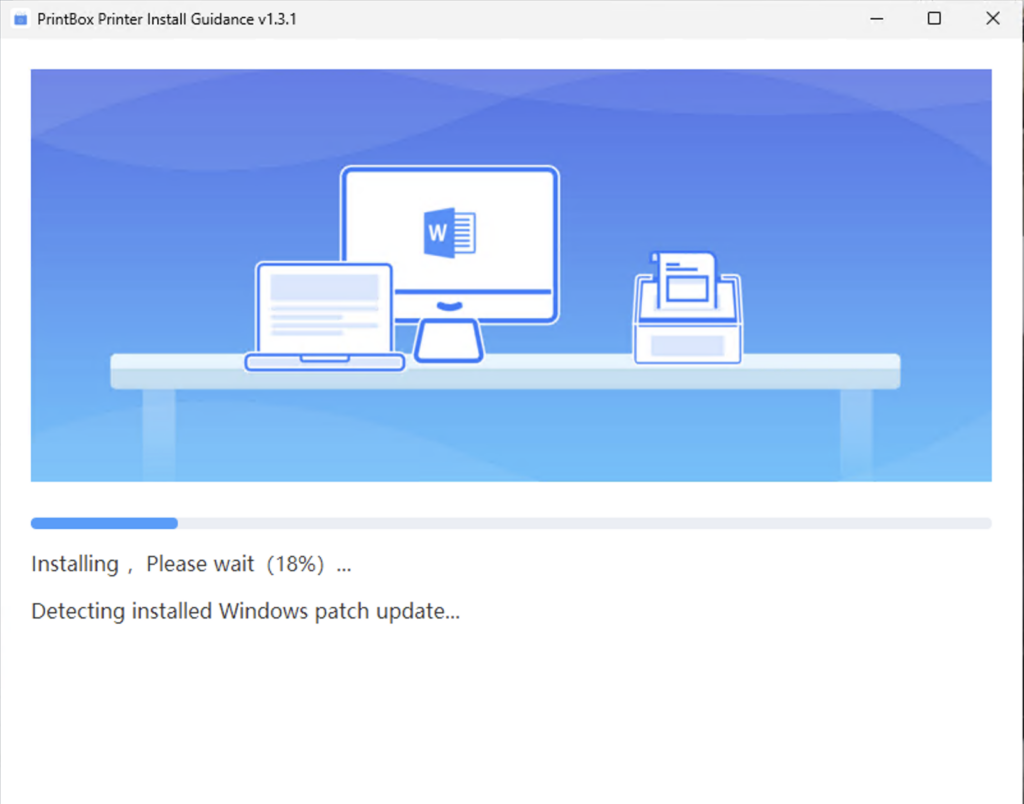
5. The tool will create a TCP/IP port for adding printers, download the necessary printer driver, and proceed with automatic installation.
6. Once the printer addition process is complete, perform a test print. Successful printing of the test page confirms the completion of printer setup.
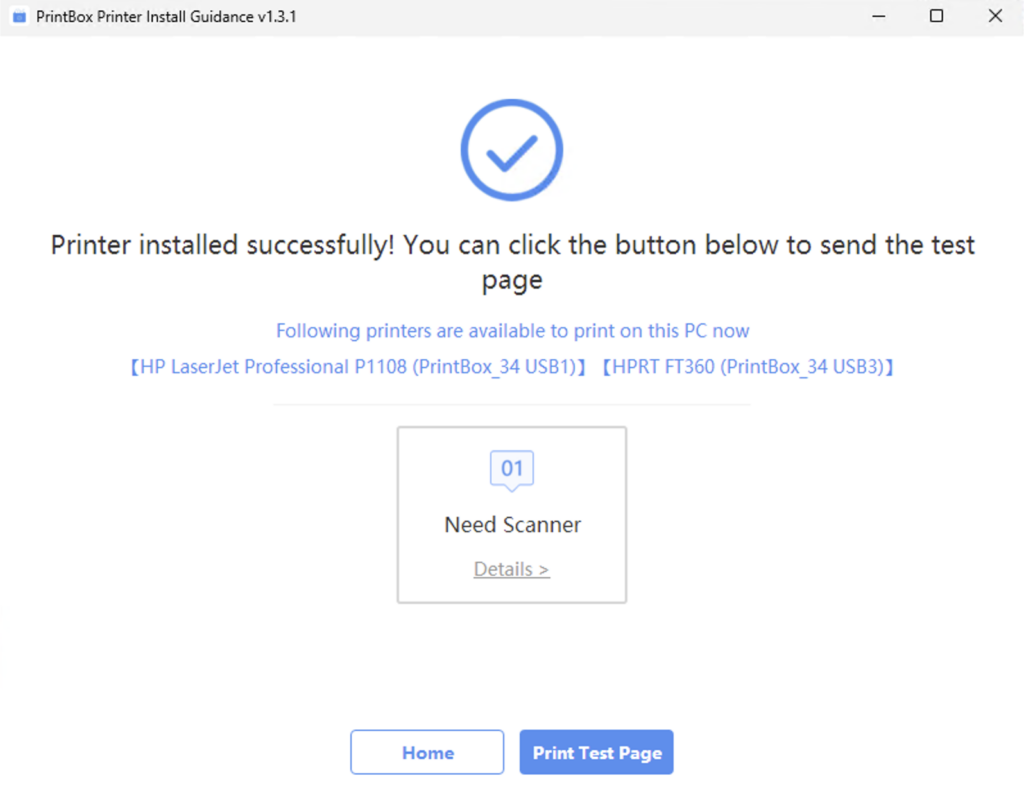
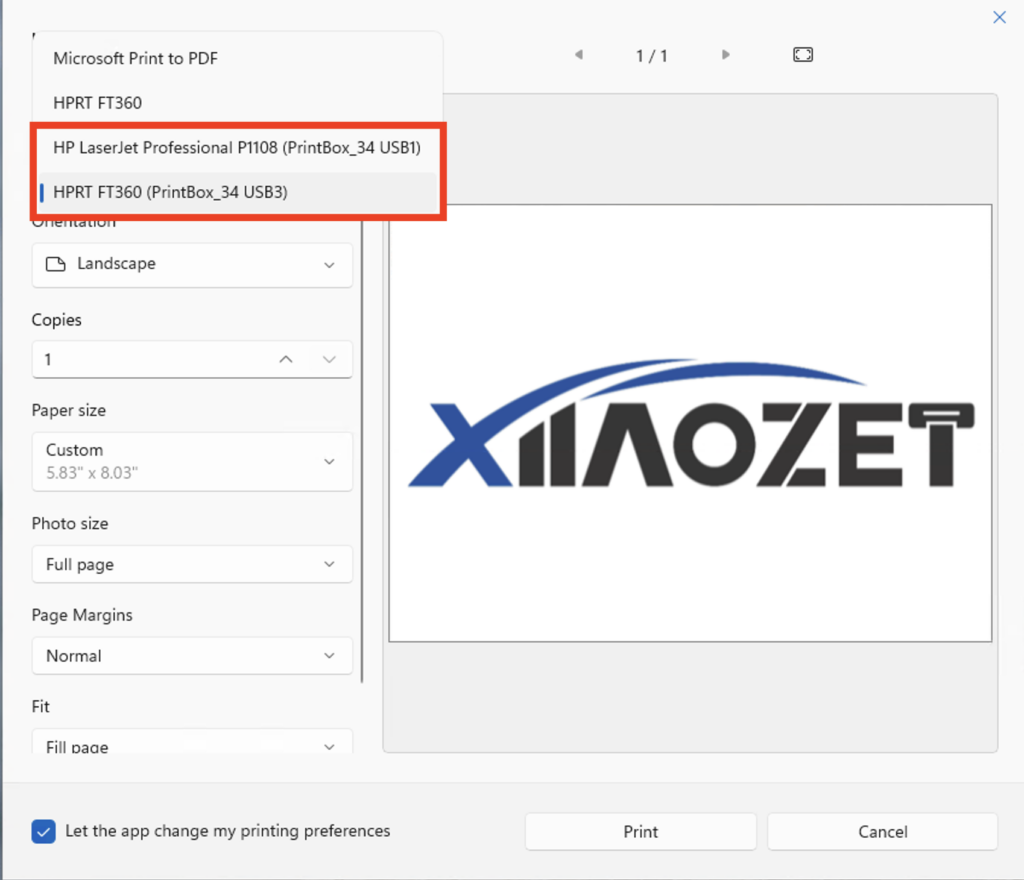
7. After successful installation, the printer will appear in the printer list, with the name followed by ‘PrintBox’.
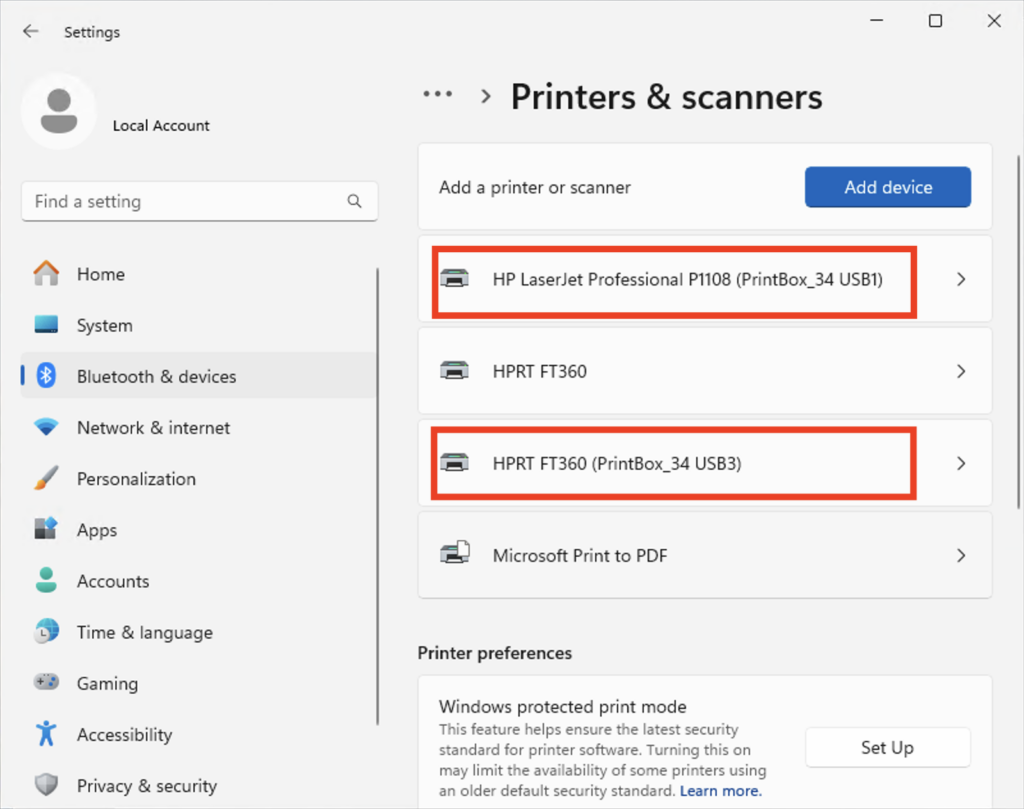
8. When printing, simply select the corresponding printer to print.
Note: If the installation fails when using this tool, please use Method 2 or Method 3 to add the printer manually.
⚠️ After the configuration is completed, please avoid modifying any settings on the web management page, such as the hostname or login password. Doing so may cause the previously configured printer settings to become invalid.
Method 2: Manually Add a Printer via IP Address (Windows)
Step One: Open the web management page of the Print Server
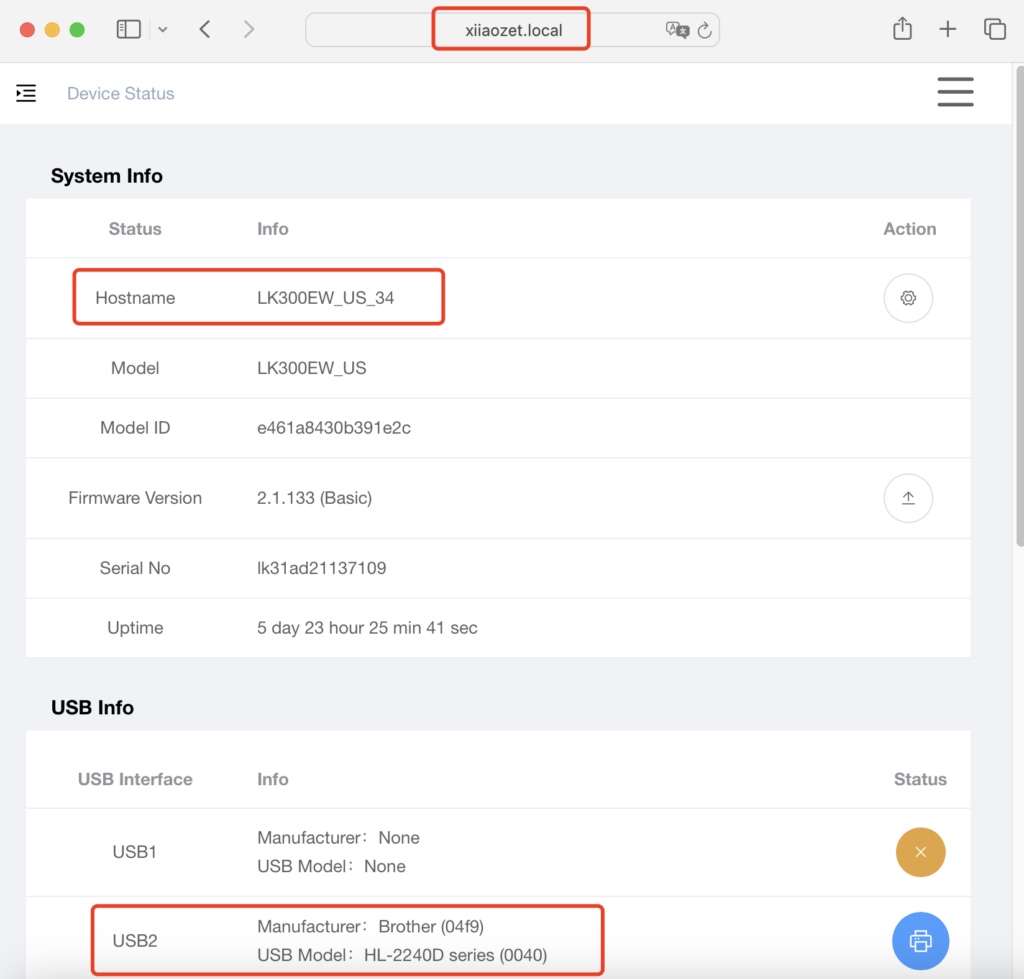
After configuring the network for print server, open your browser and enter the following address: xiiaozet.local or assigned IP address, enter to access the print server’s Web Management Page. Default Password: admin.
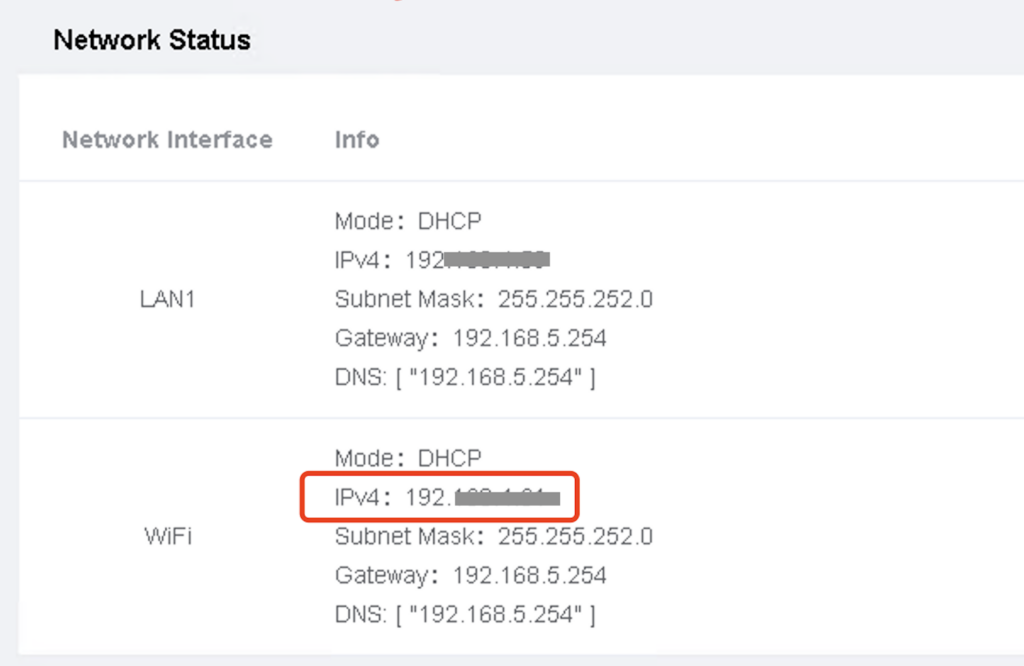
On the Web Management Page, you can find important details such as the Hostname, IP Address, and the USB Port where the printer is connected.
If you are using a wireless connection, find the IP address in the WiFi parameters. The IPv4 address is the correct IP address.
If you are using a wired connection, find the IP address in the LAN parameters. The IPv4 address is the correct IP address.

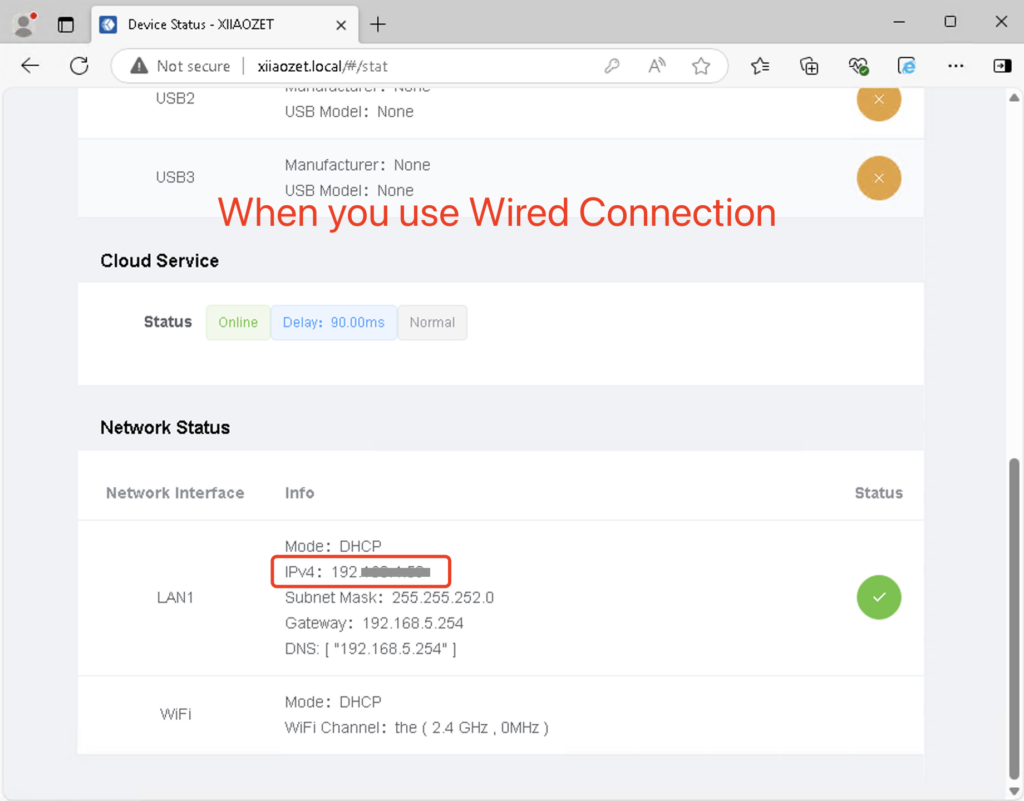
Using the correct IP address is essential for a successful setup.
Step Two: Adding the Printer
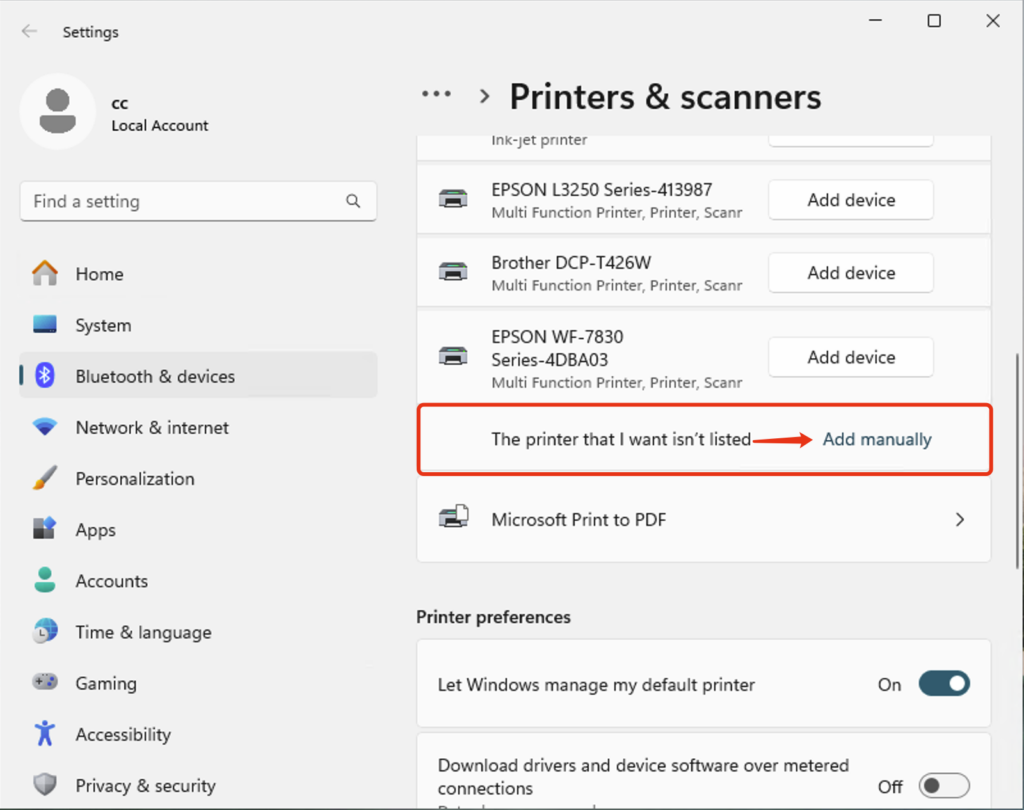
1. For Windows 10 and earlier systems, open the control panel, navigate to “Devices and Printers,” click “Add a printer,” and then click “The printer I want isn’t listed.”
Note: For Windows 11, go to the system “Settings,” click “Bluetooth & Devices,” then select “Printers & scanners,” click “Add device,” choose “The printer I want isn’t listed,” and then click “Add a printer manually”
2.Choose to Add a local printer or network printer manually, and click “Next.”

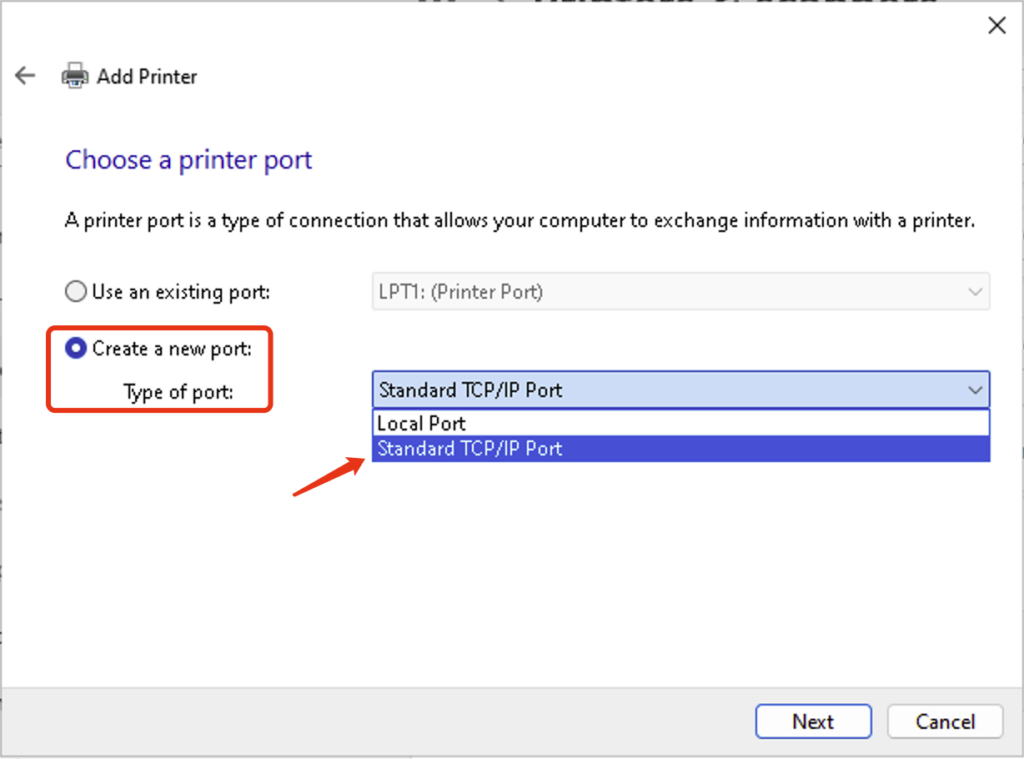
3.Select to create a new port, choose Standard TCP/IP Port, and click “Next.”
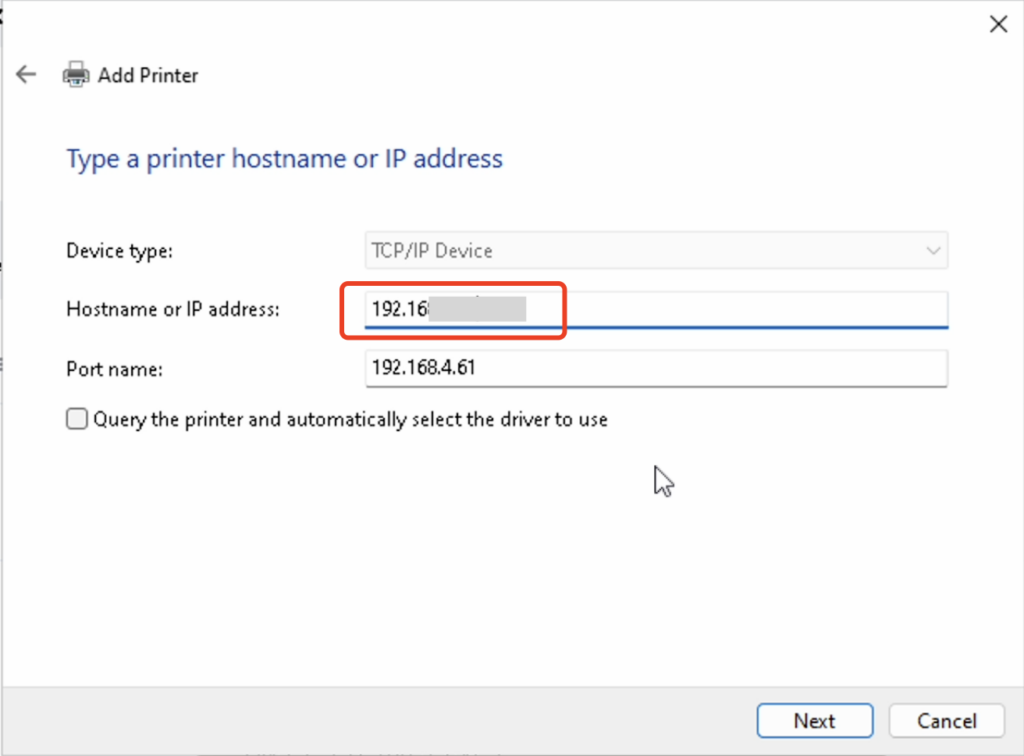
4.①Input IP address of the print server in the Hostname or IP address box. (You can obtain the IP address from the web management page, or you may acquire the print server’s IP address through other means.)
②Customize the port name (optional)
③Uncheck “Query the printer and automatically select the driver to use,” and then click “Next.”
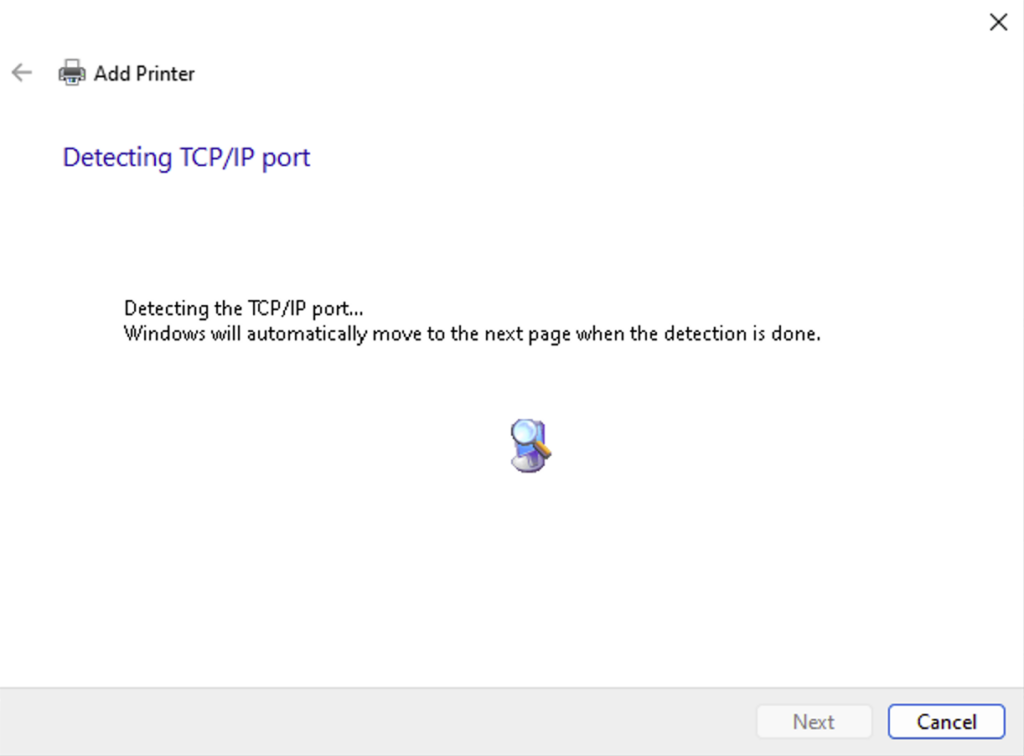
5.Wait for the detection of the TCP/IP port, approximately 1 minute.
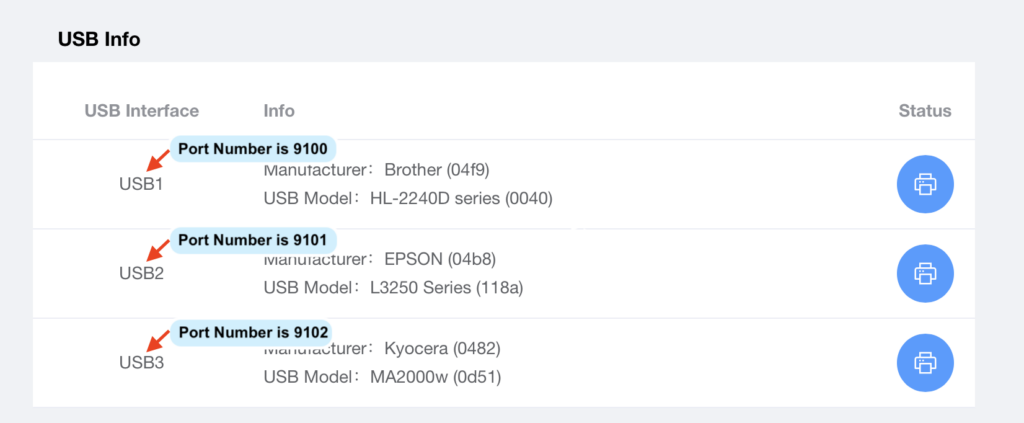
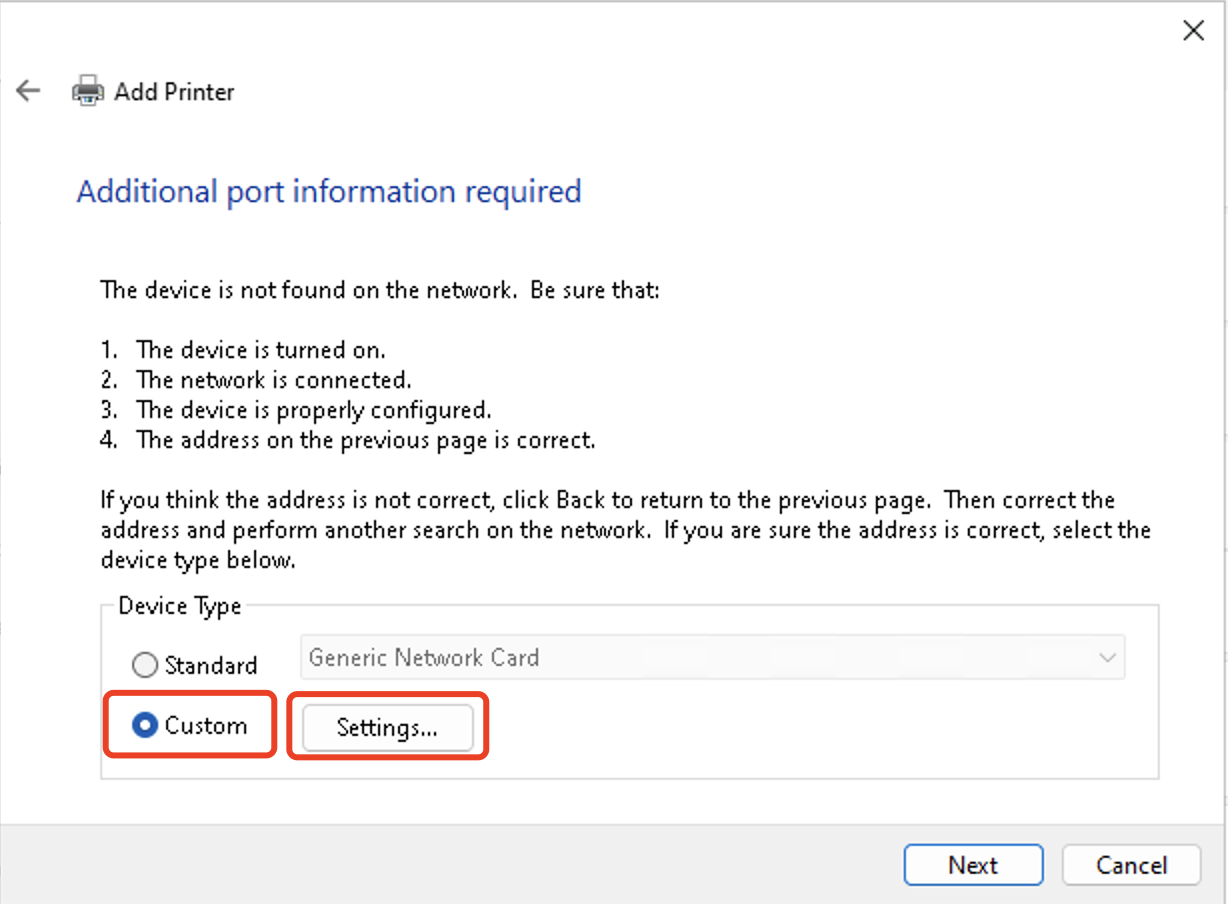
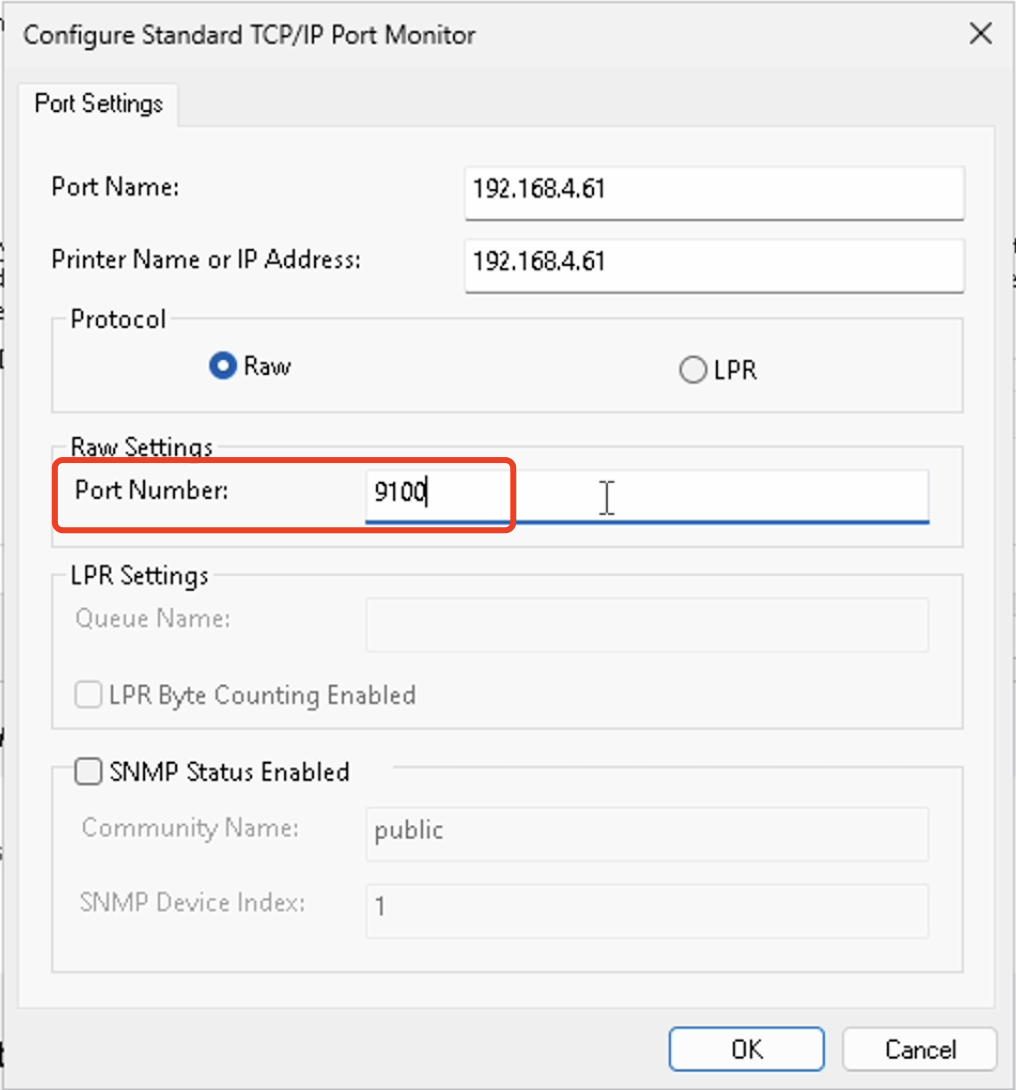
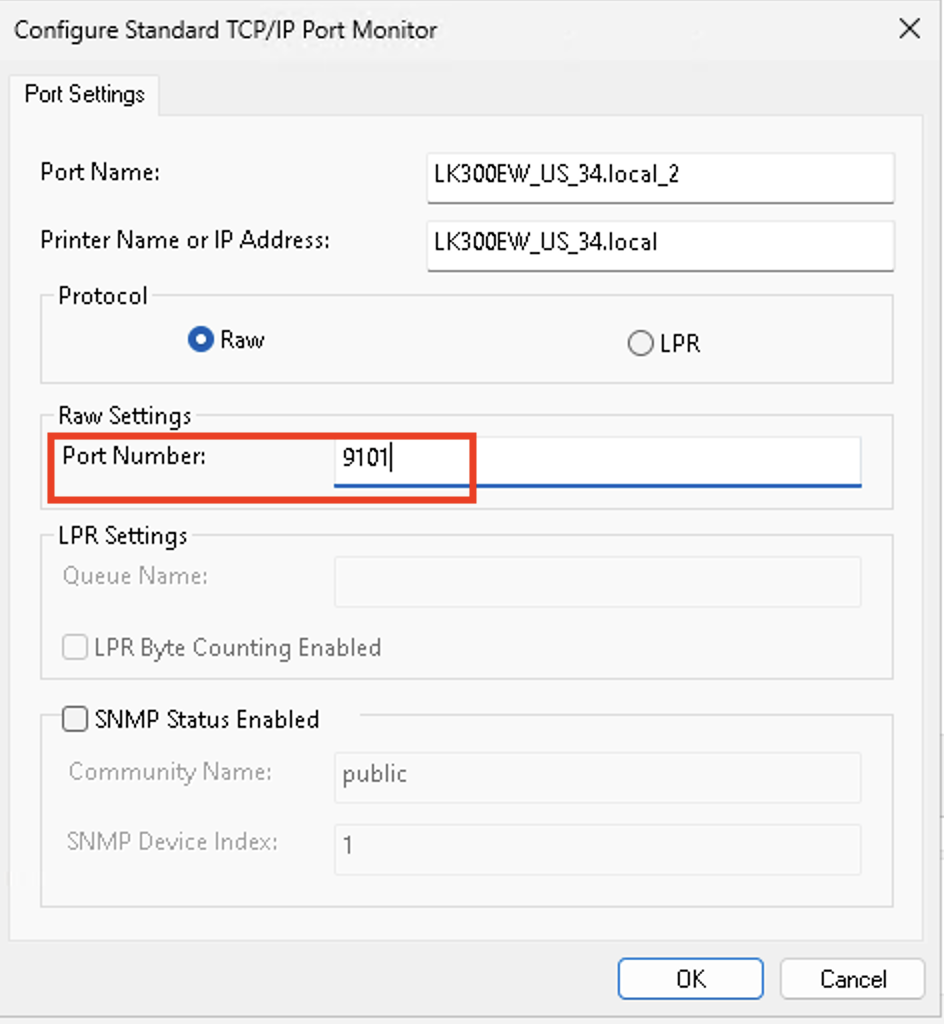
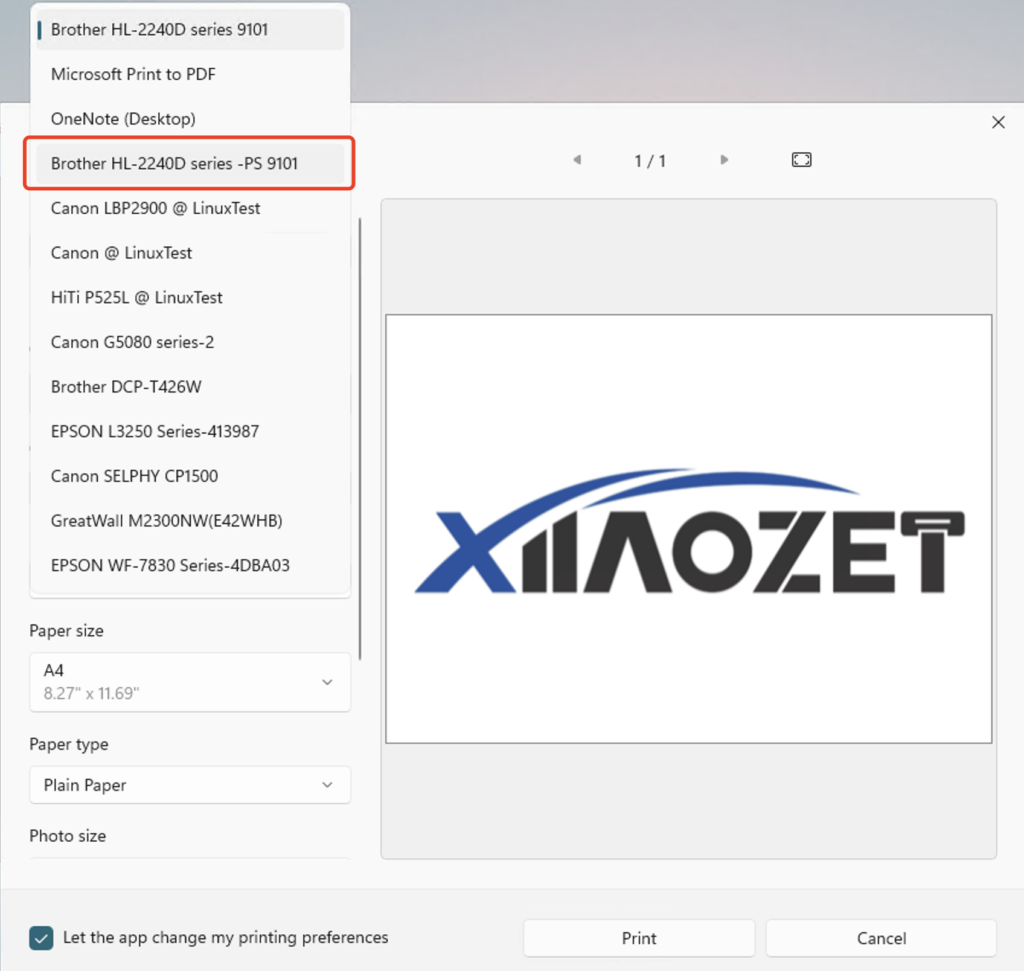
6.Choose “Custom,” and click “Setting” to check the Port Number. Ensure that you select the USB port where the printer is connected as identified on the Web Management Page.
- USB1:
9100 - USB2:
9101 - USB3:
9102
7.If the computer previously installed the printer driver, select the brand and model of the printer from the list, and click “Next.”
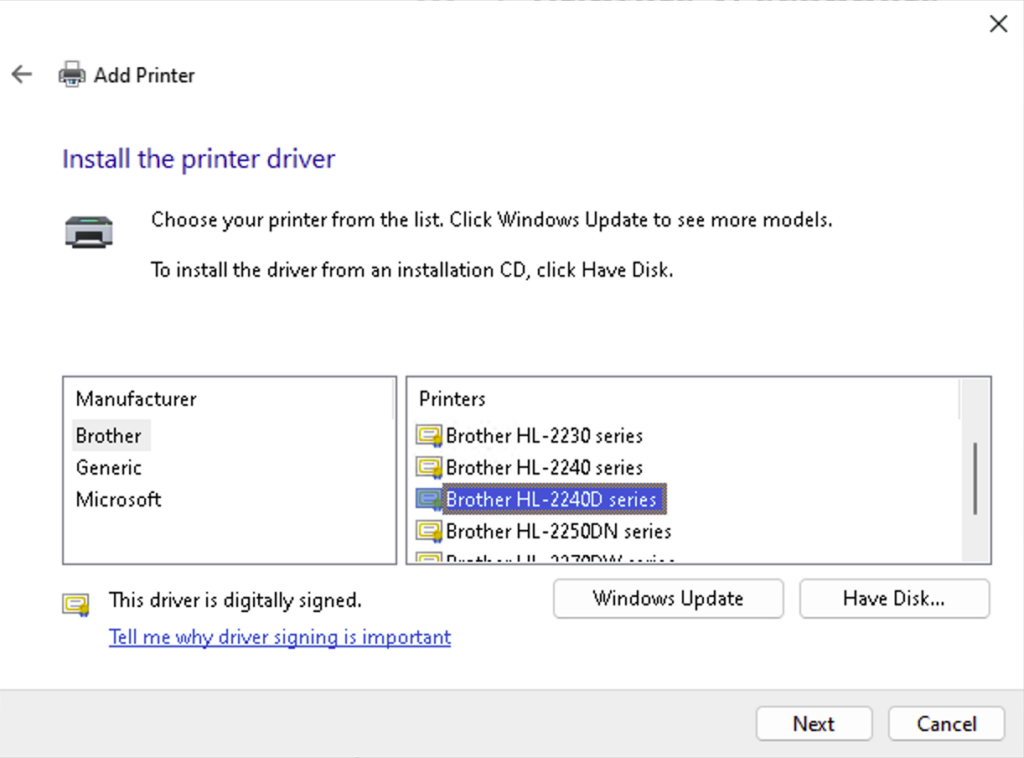
Note: If the printer model cannot be found, it means that the printer driver has not been installed on the computer, please download and install the printer driver on the computer before adding the printer.
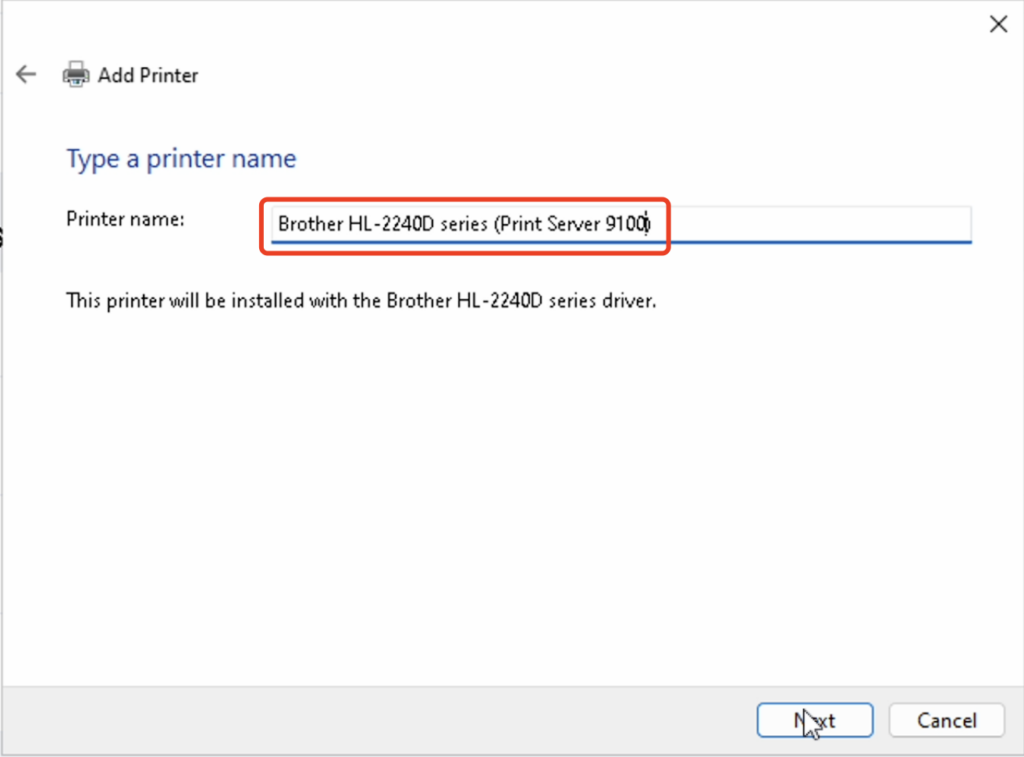
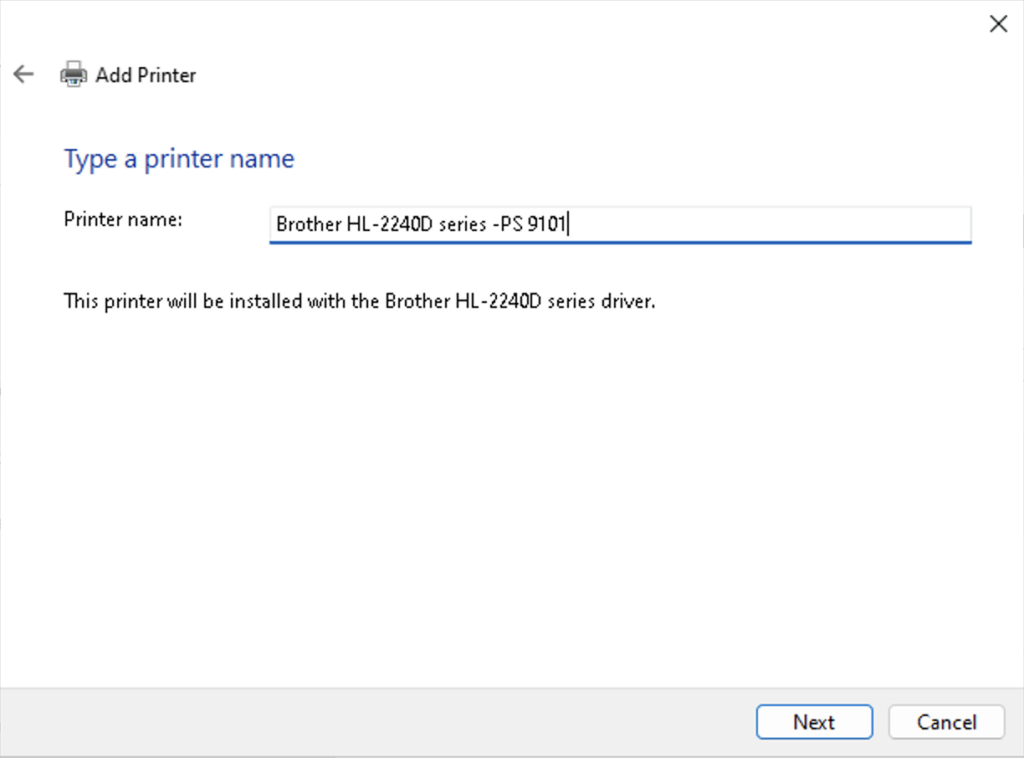
8.Optionally, customize the name of the printer, and click “Next.” It is recommended to include terms like “Print Server” in the printer name to easily identify it and avoid selecting the wrong printer when sending print jobs.
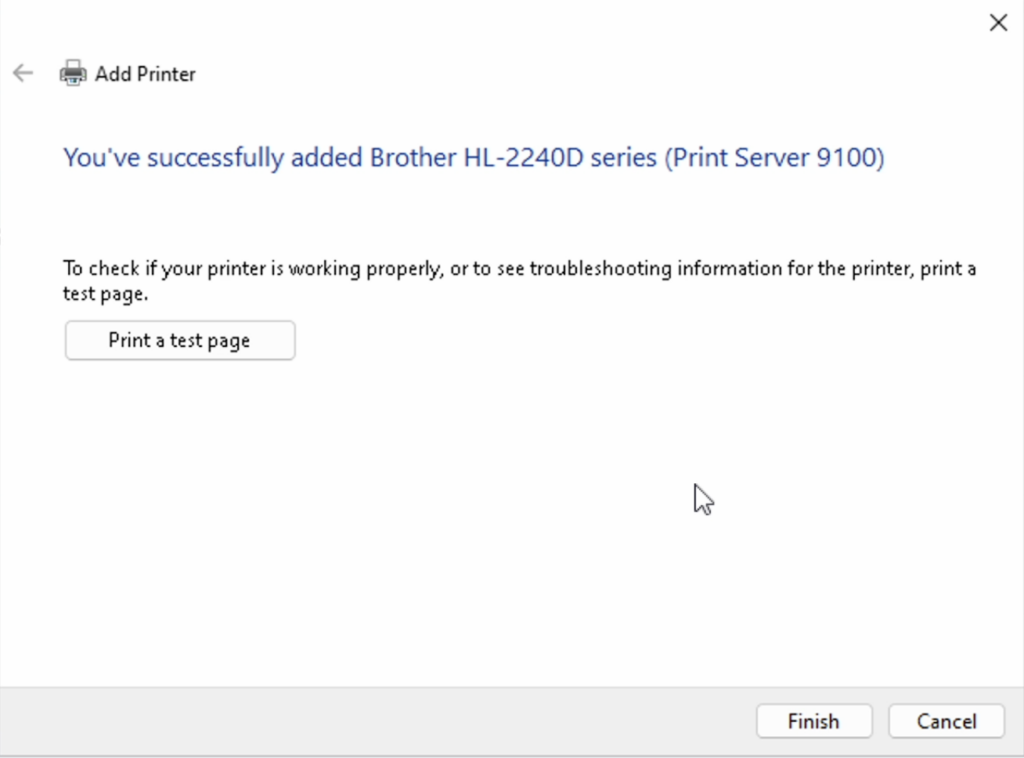
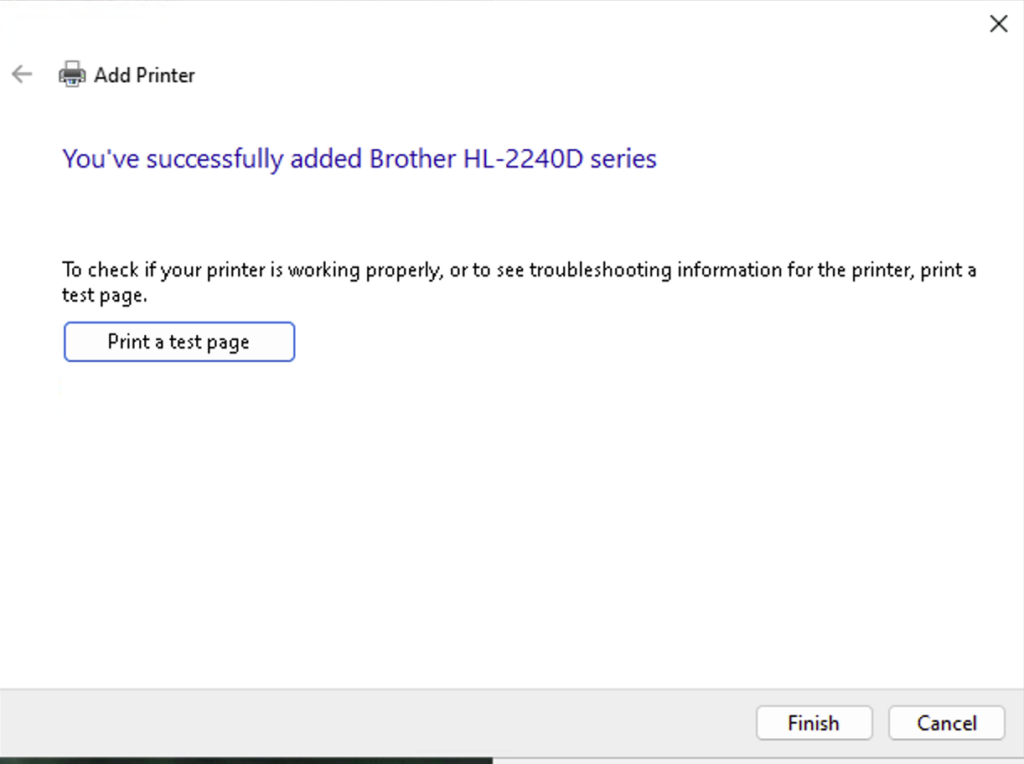
9.After completing the addition, print a test page to verify the settings. If the test page prints successfully, click “Finish,” indicating successful addition of the printer.
If printing a test page is unsuccessful, remove the added printer and port name from your computer. Then, re-add the printer following the steps above, ensuring each step is correctly completed.
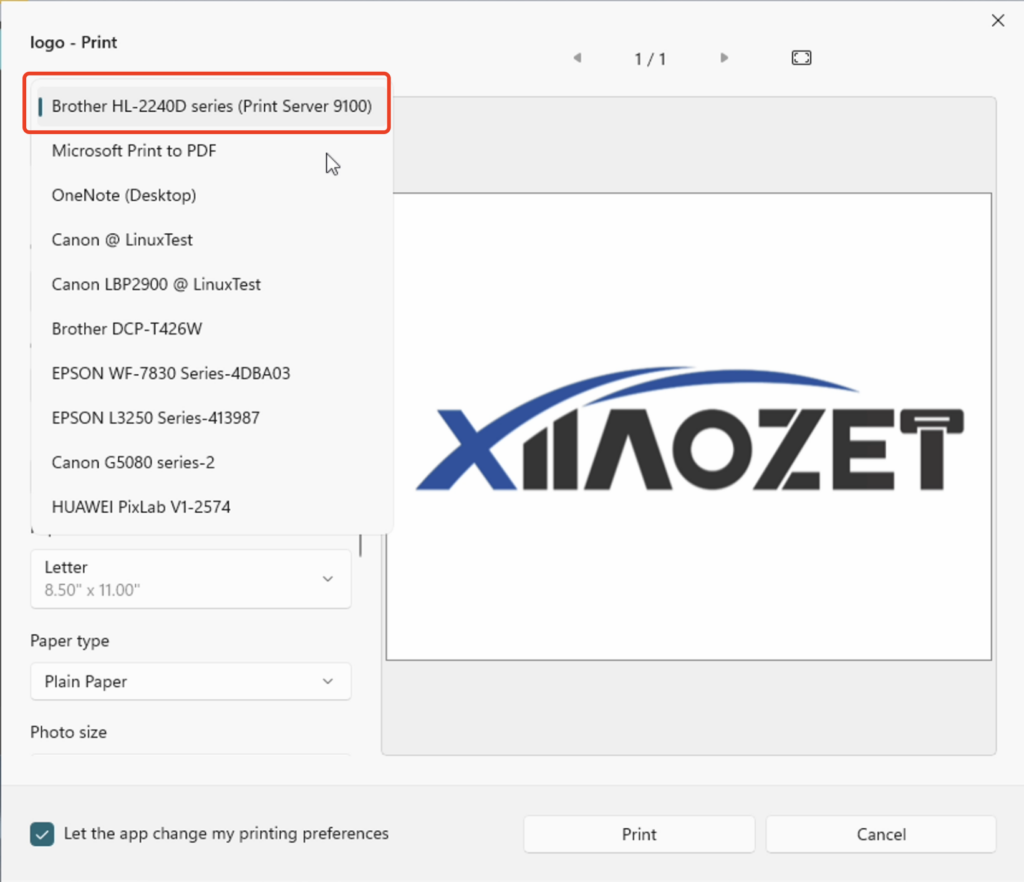
10. Important !!! When sending a print job, make sure to select the newly added printer by its name.
Note: If the router reassigns a new IP address to the print server during operation, you will need to add the printer again on your computer using the new IP address.
Method 3: Manually Add a Printer via Hostname (Windows)
Step One: Open the web management page of the Print Server
After configuring the network for print server, open your browser and enter the following address: xiiaozet.local or assigned IP address enter to access the print server’s Web Management Page. Default Password: admin.
On the Web Management Page, you can find important details such as the Hostname, IP Address, and the USB Port where the printer is connected.
Step Two: Adding the Printer
1. For Windows 10 and earlier systems, open the control panel, navigate to “Devices and Printers,” click “Add a printer,” and then click “The printer I want isn’t listed.”
Note: For Windows 11, go to the system “Settings,” click “Bluetooth & Devices,” then select “Printers & scanners,” click “Add device,” choose “The printer I want isn’t listed,” and then click “Add a printer manually”
2.Choose to manually add a local printer or network printer, and click “Next.”

3.Select to create a new port, choose Standard TCP/IP Port, and click “Next.”
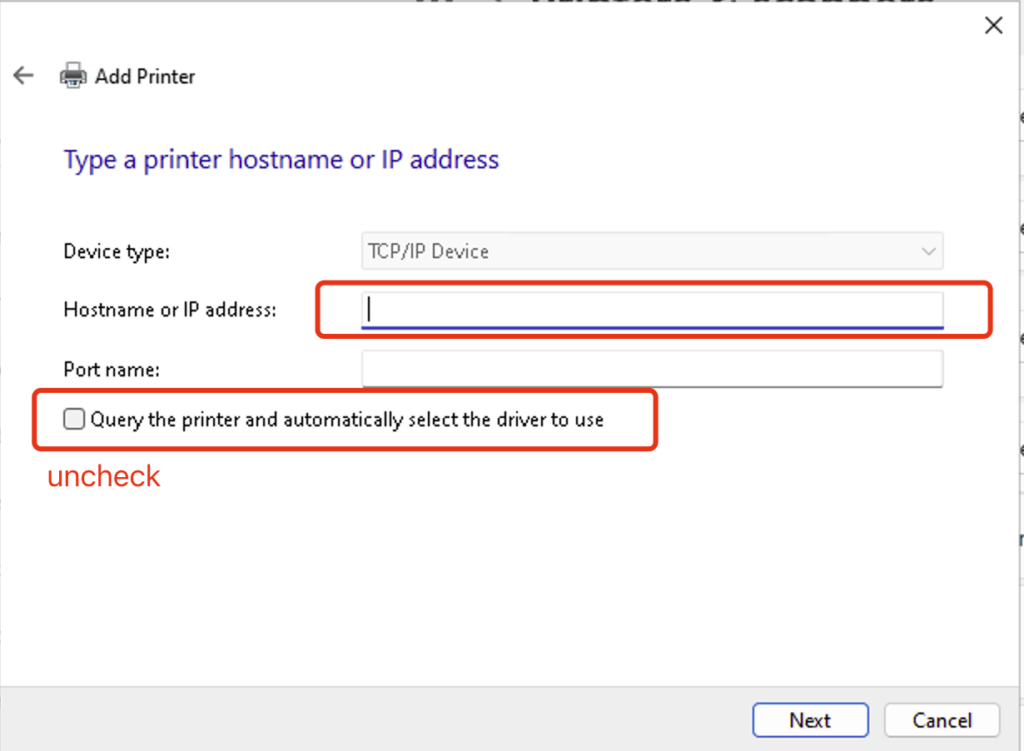
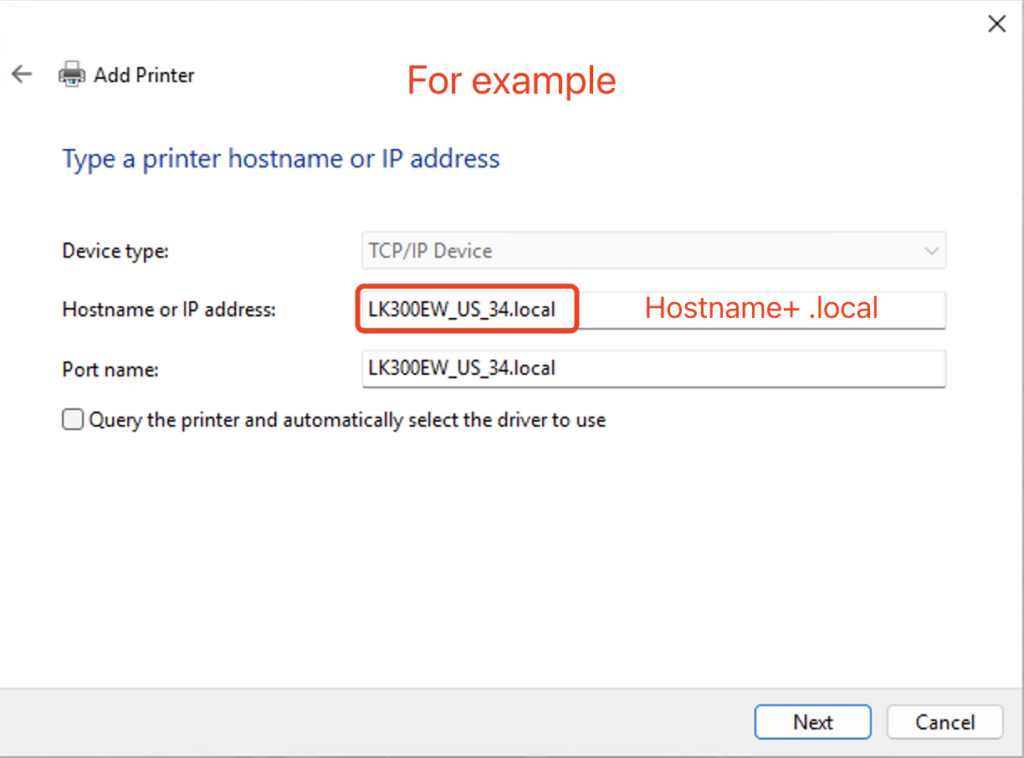
4.①Input the Hostname followed by .local (e.g., LK300EW_US_34.local) in the Hostname or IP address box.
②Customize the port name (optional)
③Uncheck “Query the printer and automatically select the driver to use,” and then click “Next.”
5.Wait for the detection of the TCP/IP port, approximately 1 minute.
6.Choose “Custom,” and click “Setting” to check the Port Number. Ensure that you select the USB port where the printer is connected as identified on the Web Management Page.
- USB1:
9100 - USB2:
9101 - USB3:
9102
7.If the computer previously installed the printer driver, select the brand and model of the printer from the list, and click “Next.”
Note: If the printer model cannot be found, it means that the printer driver has not been installed on the computer, please download and install the printer driver on the computer before adding the printer.
8.Optionally, customize the name of the printer, and click “Next.” It is recommended to include terms like “Print Server” in the printer name to easily identify it and avoid selecting the wrong printer when sending print jobs.
9.After completing the addition, print a test page to verify the settings. If the test page prints successfully, click “Finish,” indicating successful addition of the printer.
If printing a test page is unsuccessful, remove the added printer from your computer. Then, re-add the printer following the steps above, ensuring each step is correctly completed.
10. Important !!! When sending a print job, make sure to select the newly added printer by its name.
⚠️ After the configuration is completed, please avoid modifying any settings on the web management page, such as the hostname or login password. Doing so may cause the previously configured printer settings to become invalid. If you change the device Hostname, you will need to re-install the printer.
Common Installation Issues
- If the issue persists, please send a screenshot of the error message along with a brief description to: support@xiiaozet.net
- Alternatively, you can contact us directly using the Chat Box on the right.
- Our technical support team typically responds within 12 hours.
How can we have all computers be able to print to our older HP printer without having to download the hardware and go thru all the complicated steps?
The setup tool is designed to simplify the installation process. Once the printer has been successfully added to your computer, you can delete the tool. If you’re unable to download the tool, please use the second or third installation method — no software download is required.
I am not able to get the printer to accept print jobs over my home WiFi network using the LK100EW Print Server. The device looks like it has competed the configurations and the USB and Cloud indicator lights are on and steady.
Please make sure to select the protocol “HP Jetdirect – Socket.”